Manual
FingerDrumPad Operation Manual
Every mode, every control — explained step by step. Jump to any section from the contents on the left, or read straight through.
1. Overview
FingerDrumPad is organized around five tabs, shown in the sidebar (iPad) or tab bar (iPhone). Switch between them at any time — your kit, pattern, and settings persist across tabs.
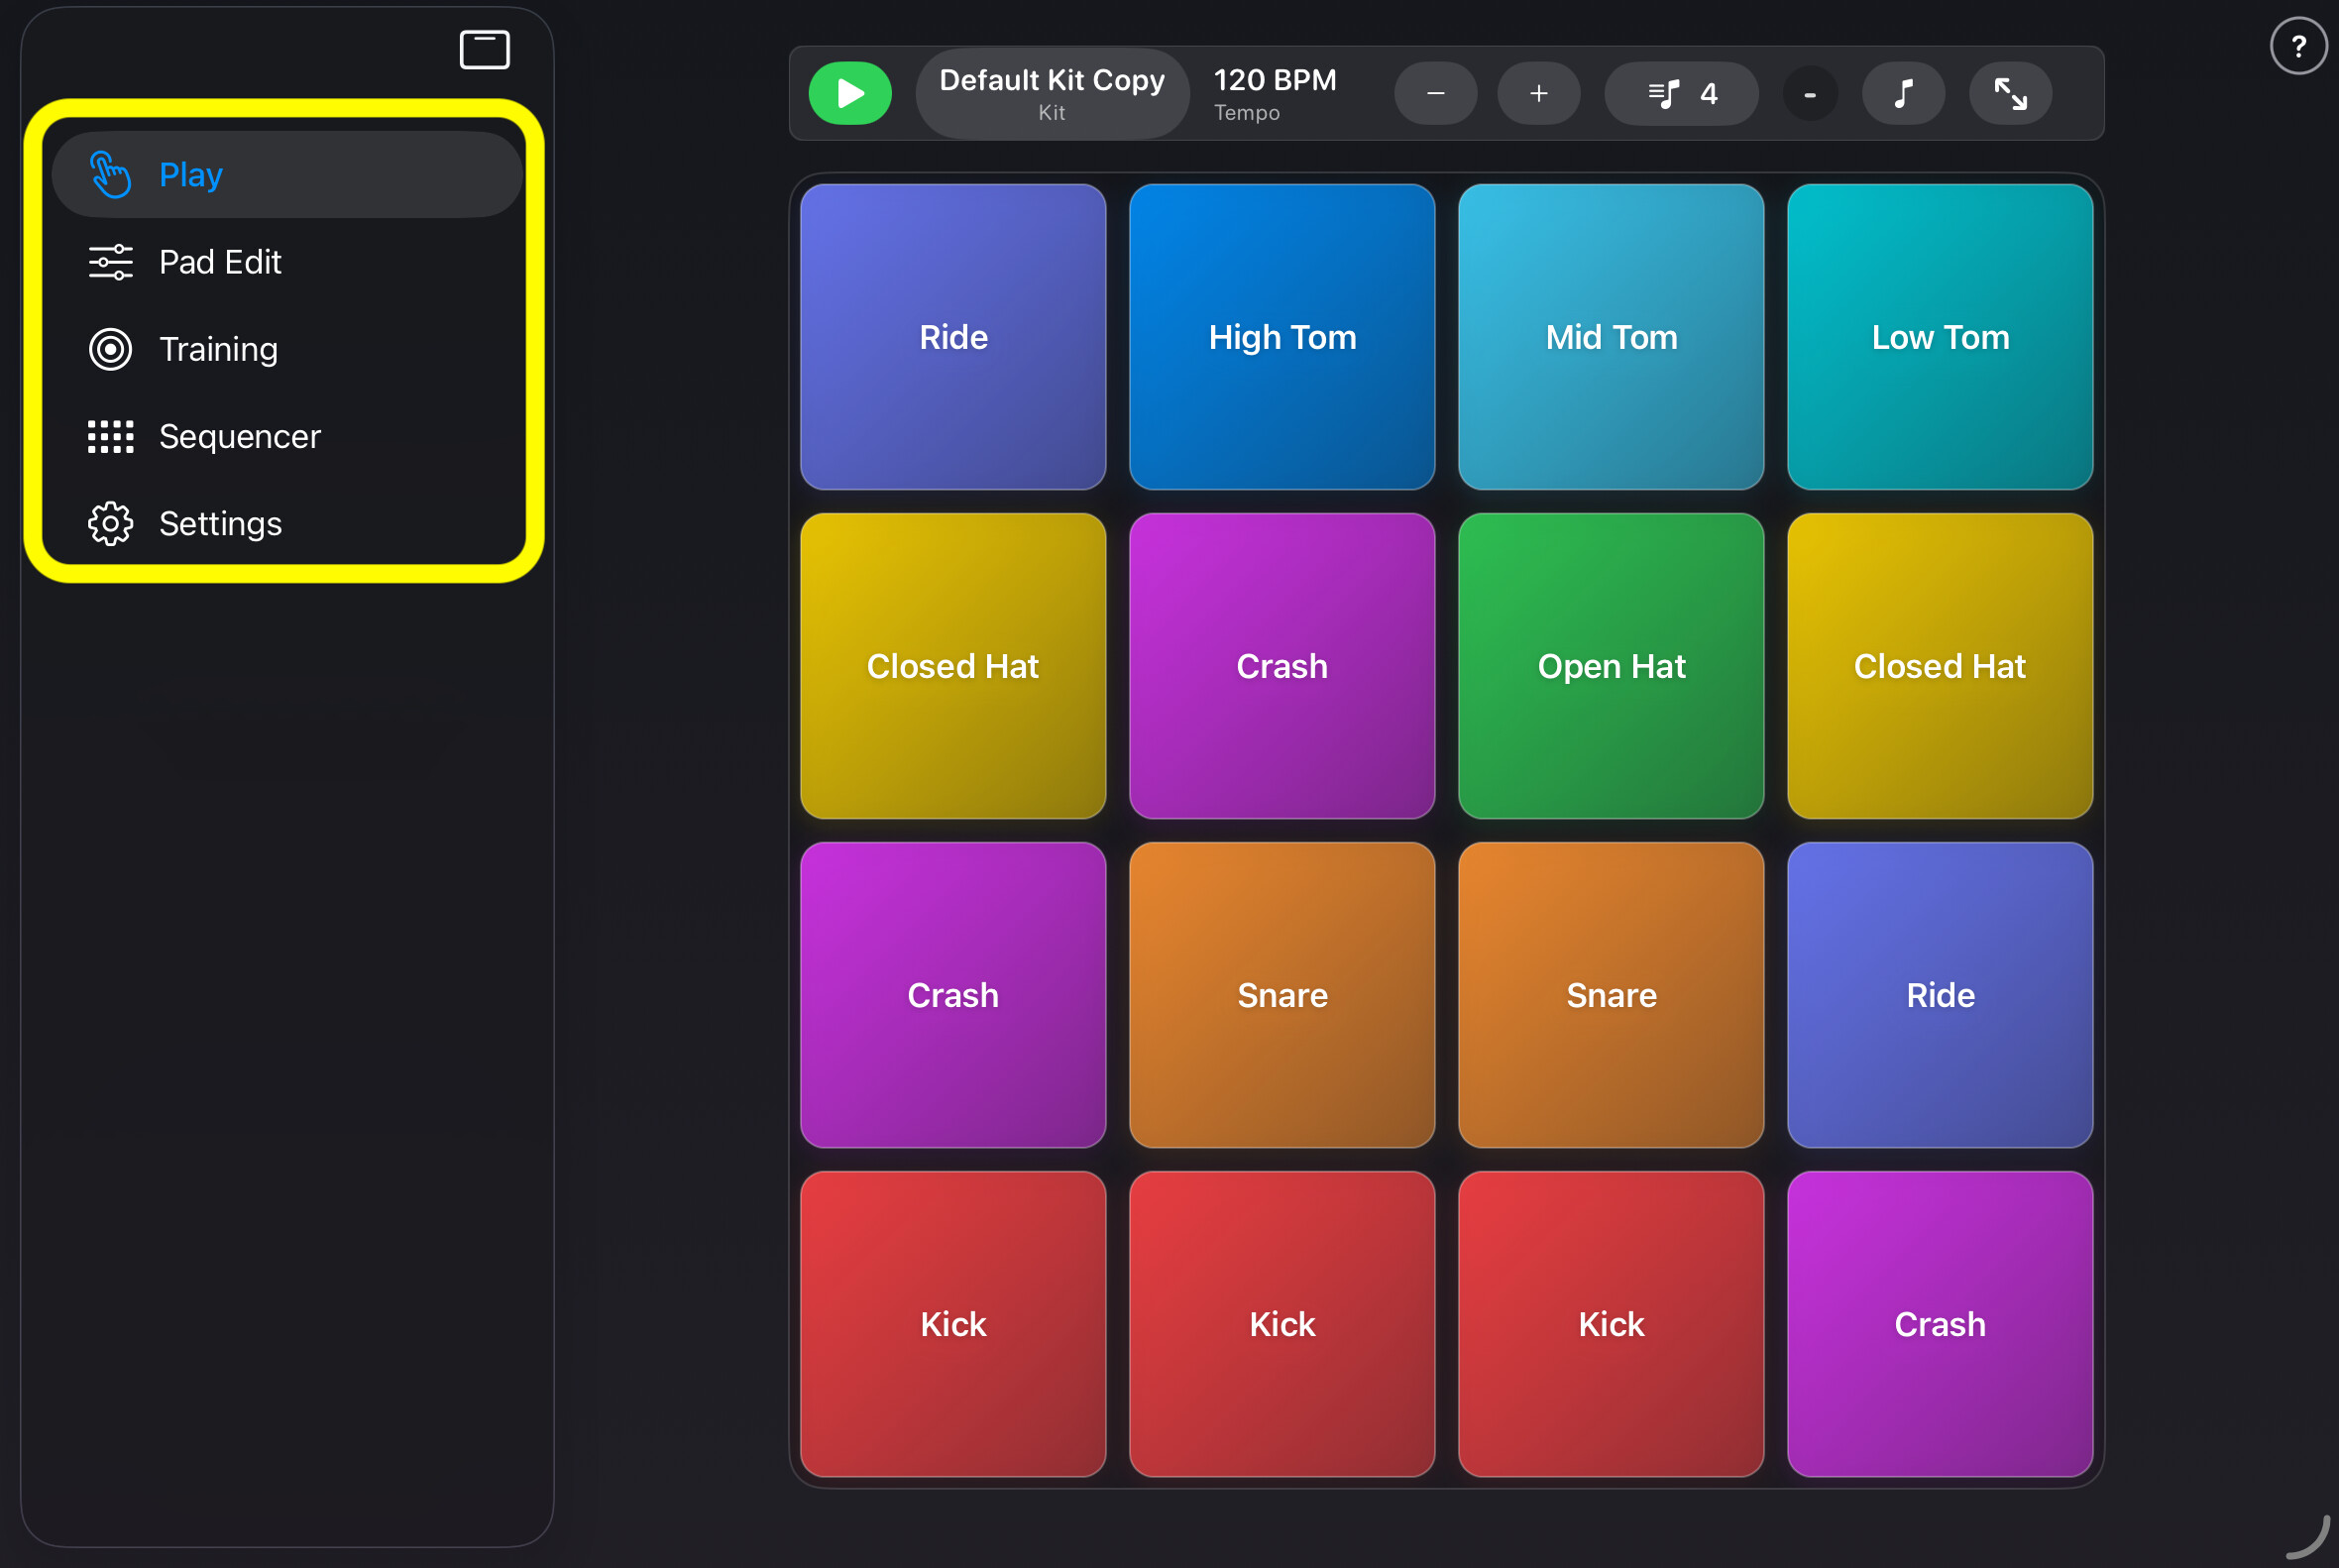
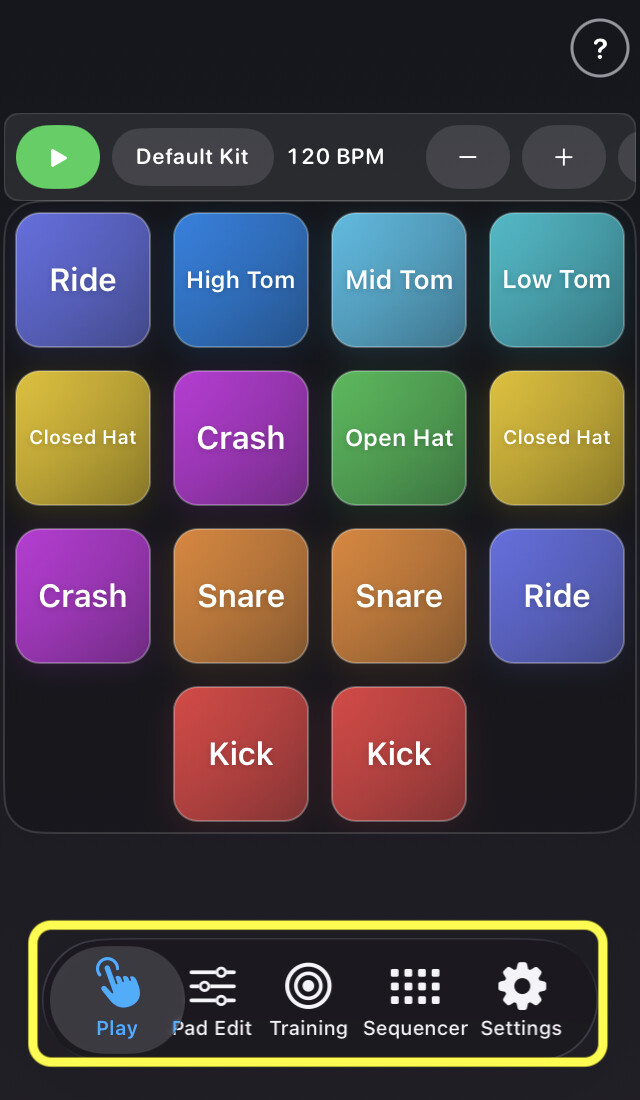
| Tab | Purpose |
|---|---|
| Play | Perform. Just tap the pads. |
| Pad Edit | Shape pads, place them anywhere, assign sounds. |
| Training | Practice with real-time judgment and scoring. |
| Sequencer | Build rhythm patterns step by step. |
| Settings | Velocity, haptics, MIDI, diagnostics, and more. |
The "?" button. Every performance mode (Play, Pad Edit, Training, Sequencer) shows a circled "?" button in the top-right corner. Tap it at any time to open a sheet listing every icon and control on the current screen. On Play's fullscreen mode the button fades out so it never obstructs the playing surface. This manual mirrors that in-app help, in greater detail.
If you switch from Pad Edit to another tab and pad overlaps are detected, a warning dialog appears — resolve overlaps before continuing to keep playback predictable.
2. First launch & onboarding
The first time you open FingerDrumPad, a six-page interactive tutorial fills the screen. You can't get lost — each page tells you exactly what to do.
| Page | Title | What happens |
|---|---|---|
| 1 | FingerDrumPad | App icon and tagline. Tap to begin. |
| 2 | Tap to Play | An interactive pad appears. The Next button stays disabled until you actually tap a pad. Learn by doing. |
| 3 | Customize Everything | A looping demo of Pad Edit mode. |
| 4 | Practice Your Rhythm | A looping demo of Training mode. |
| 5 | Create Your Beats | A looping demo of Sequencer mode. |
| 6 | Ready to Play! | Completion screen. Tutorial finished. |
Completion is remembered on the device, so the tutorial runs only once. To replay it later, open Settings → View Tutorial.
3. Play mode
Perform. This is where you spend most of your time.
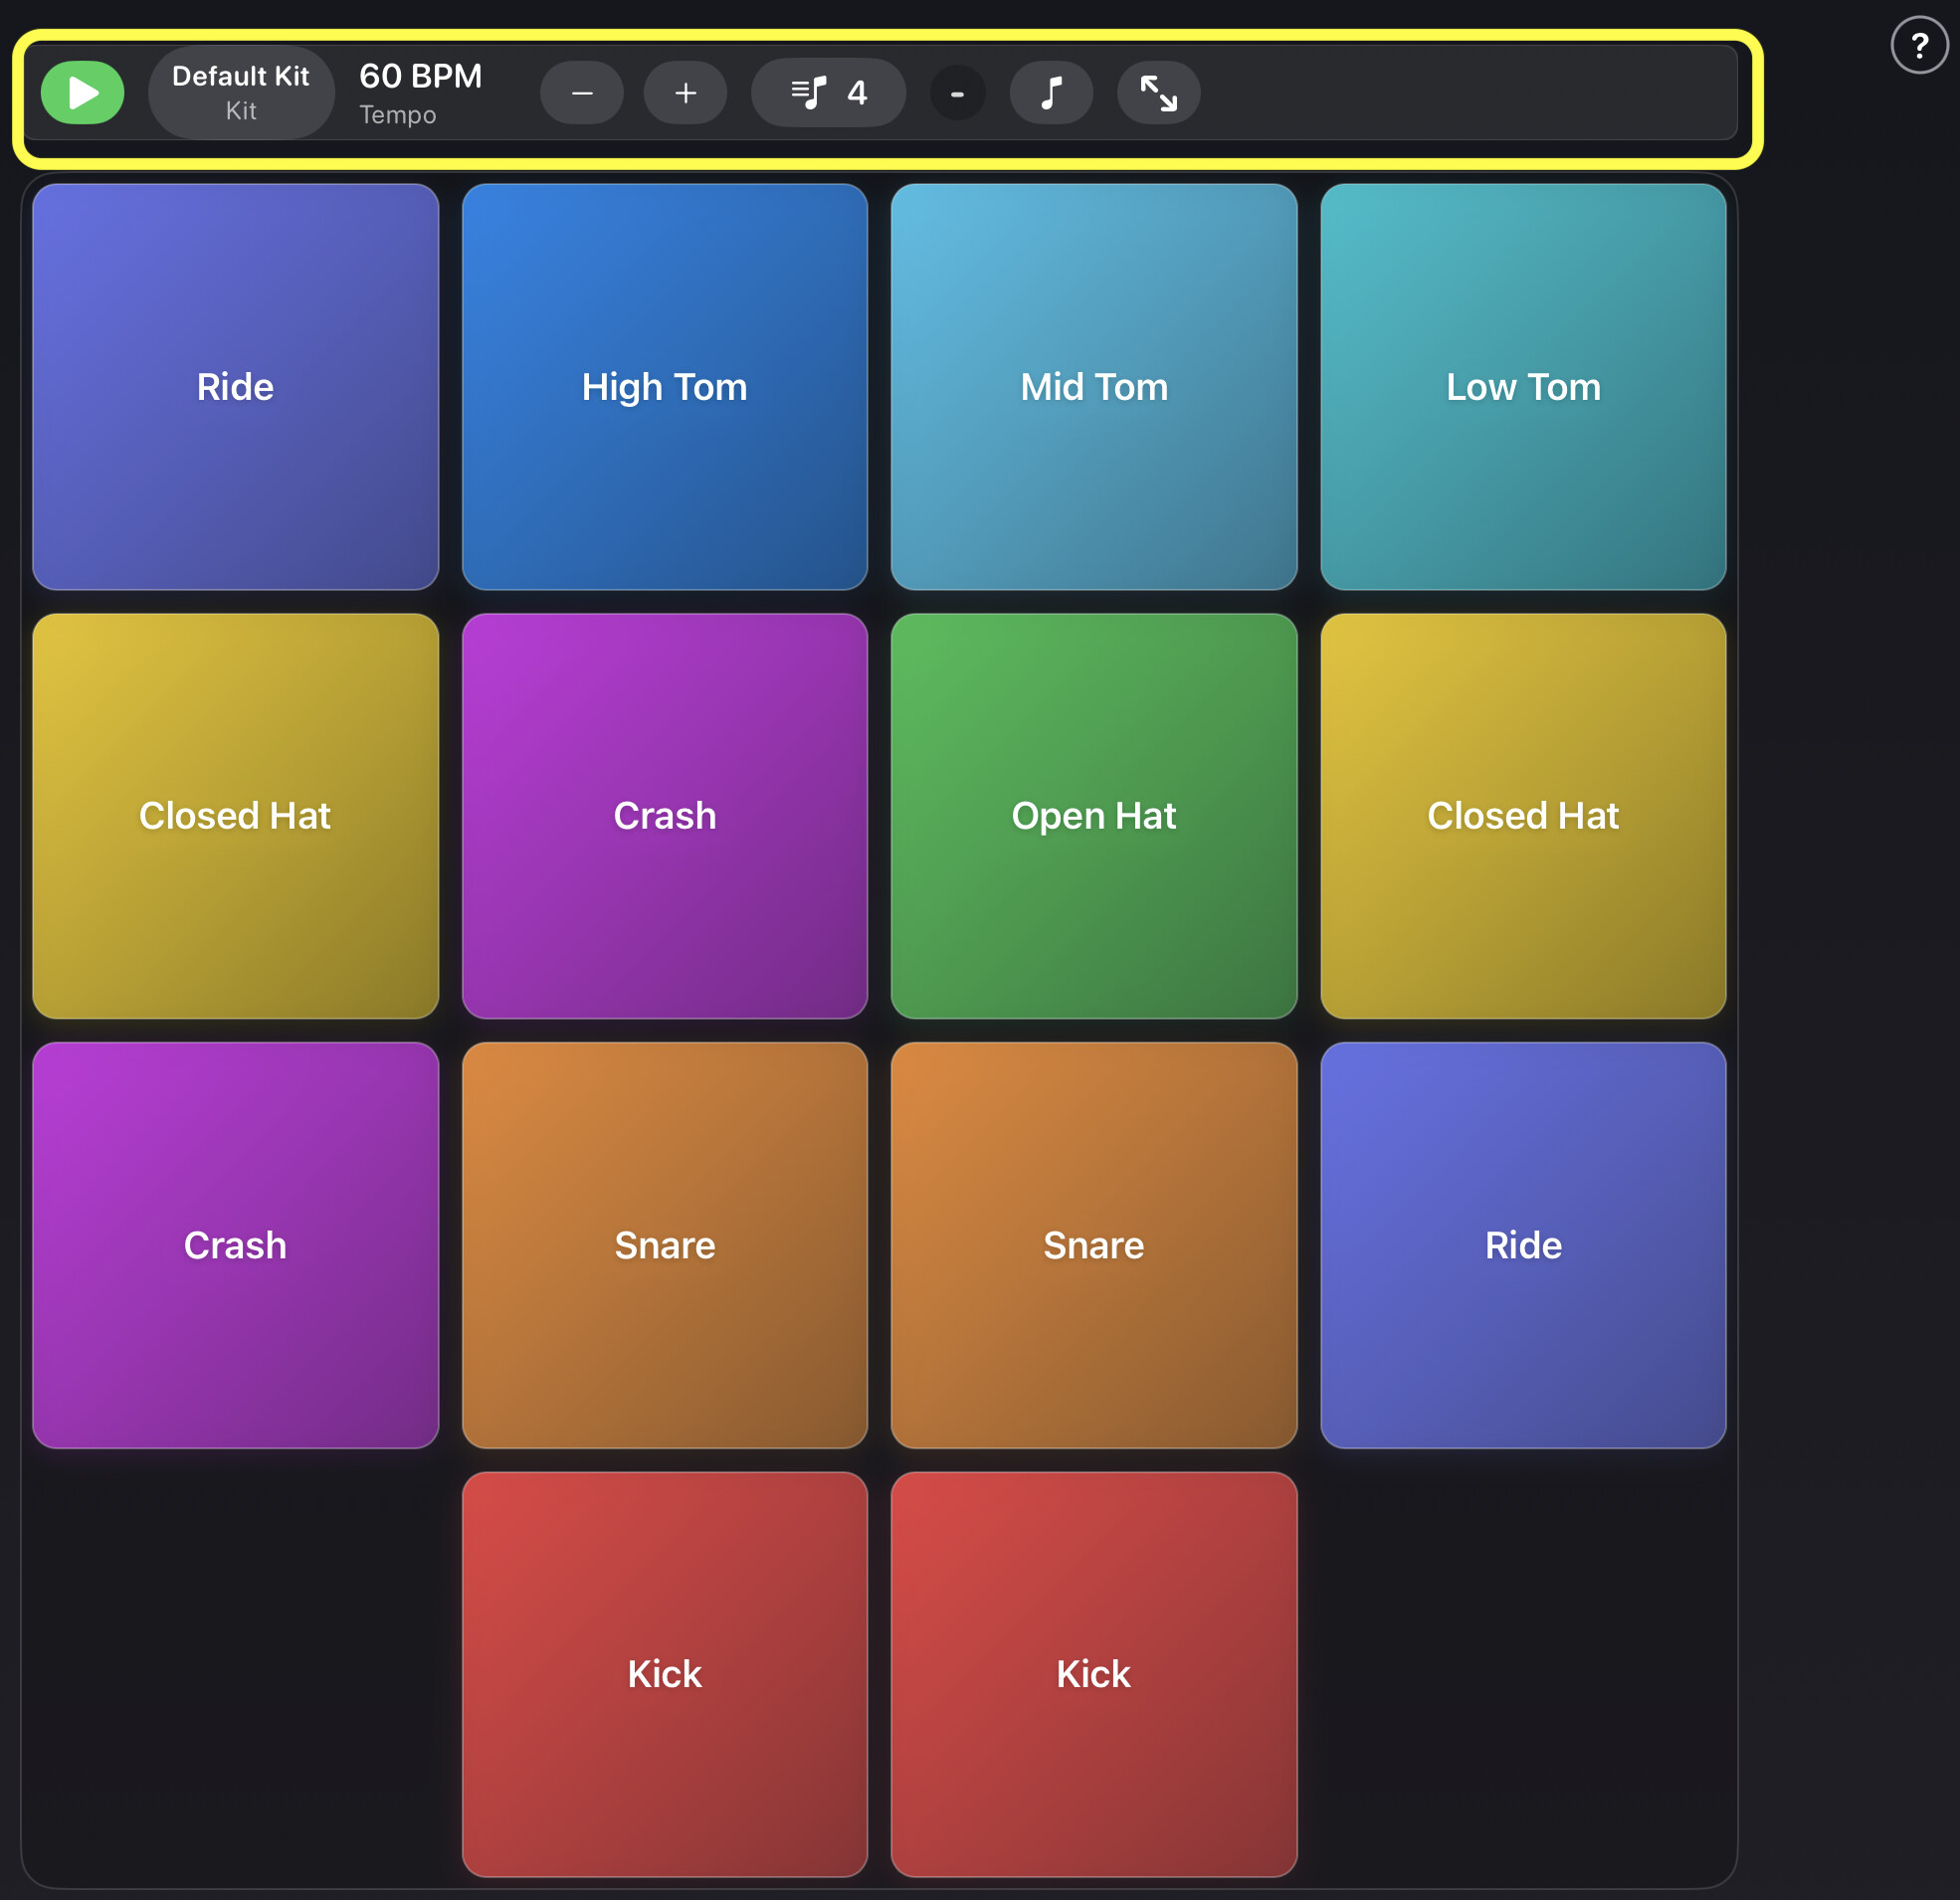
Performing
- Tap a pad to play its sound.
- Tap multiple pads at once with the fingers of both hands — kick and snare together, hi-hat ghosting while you move around the toms.
- Long-press a cymbal pad (≈380 ms) to choke (mute) the sound. Hit a crash and stop it dead; control a jazz ride cymbal.
Backing tracks
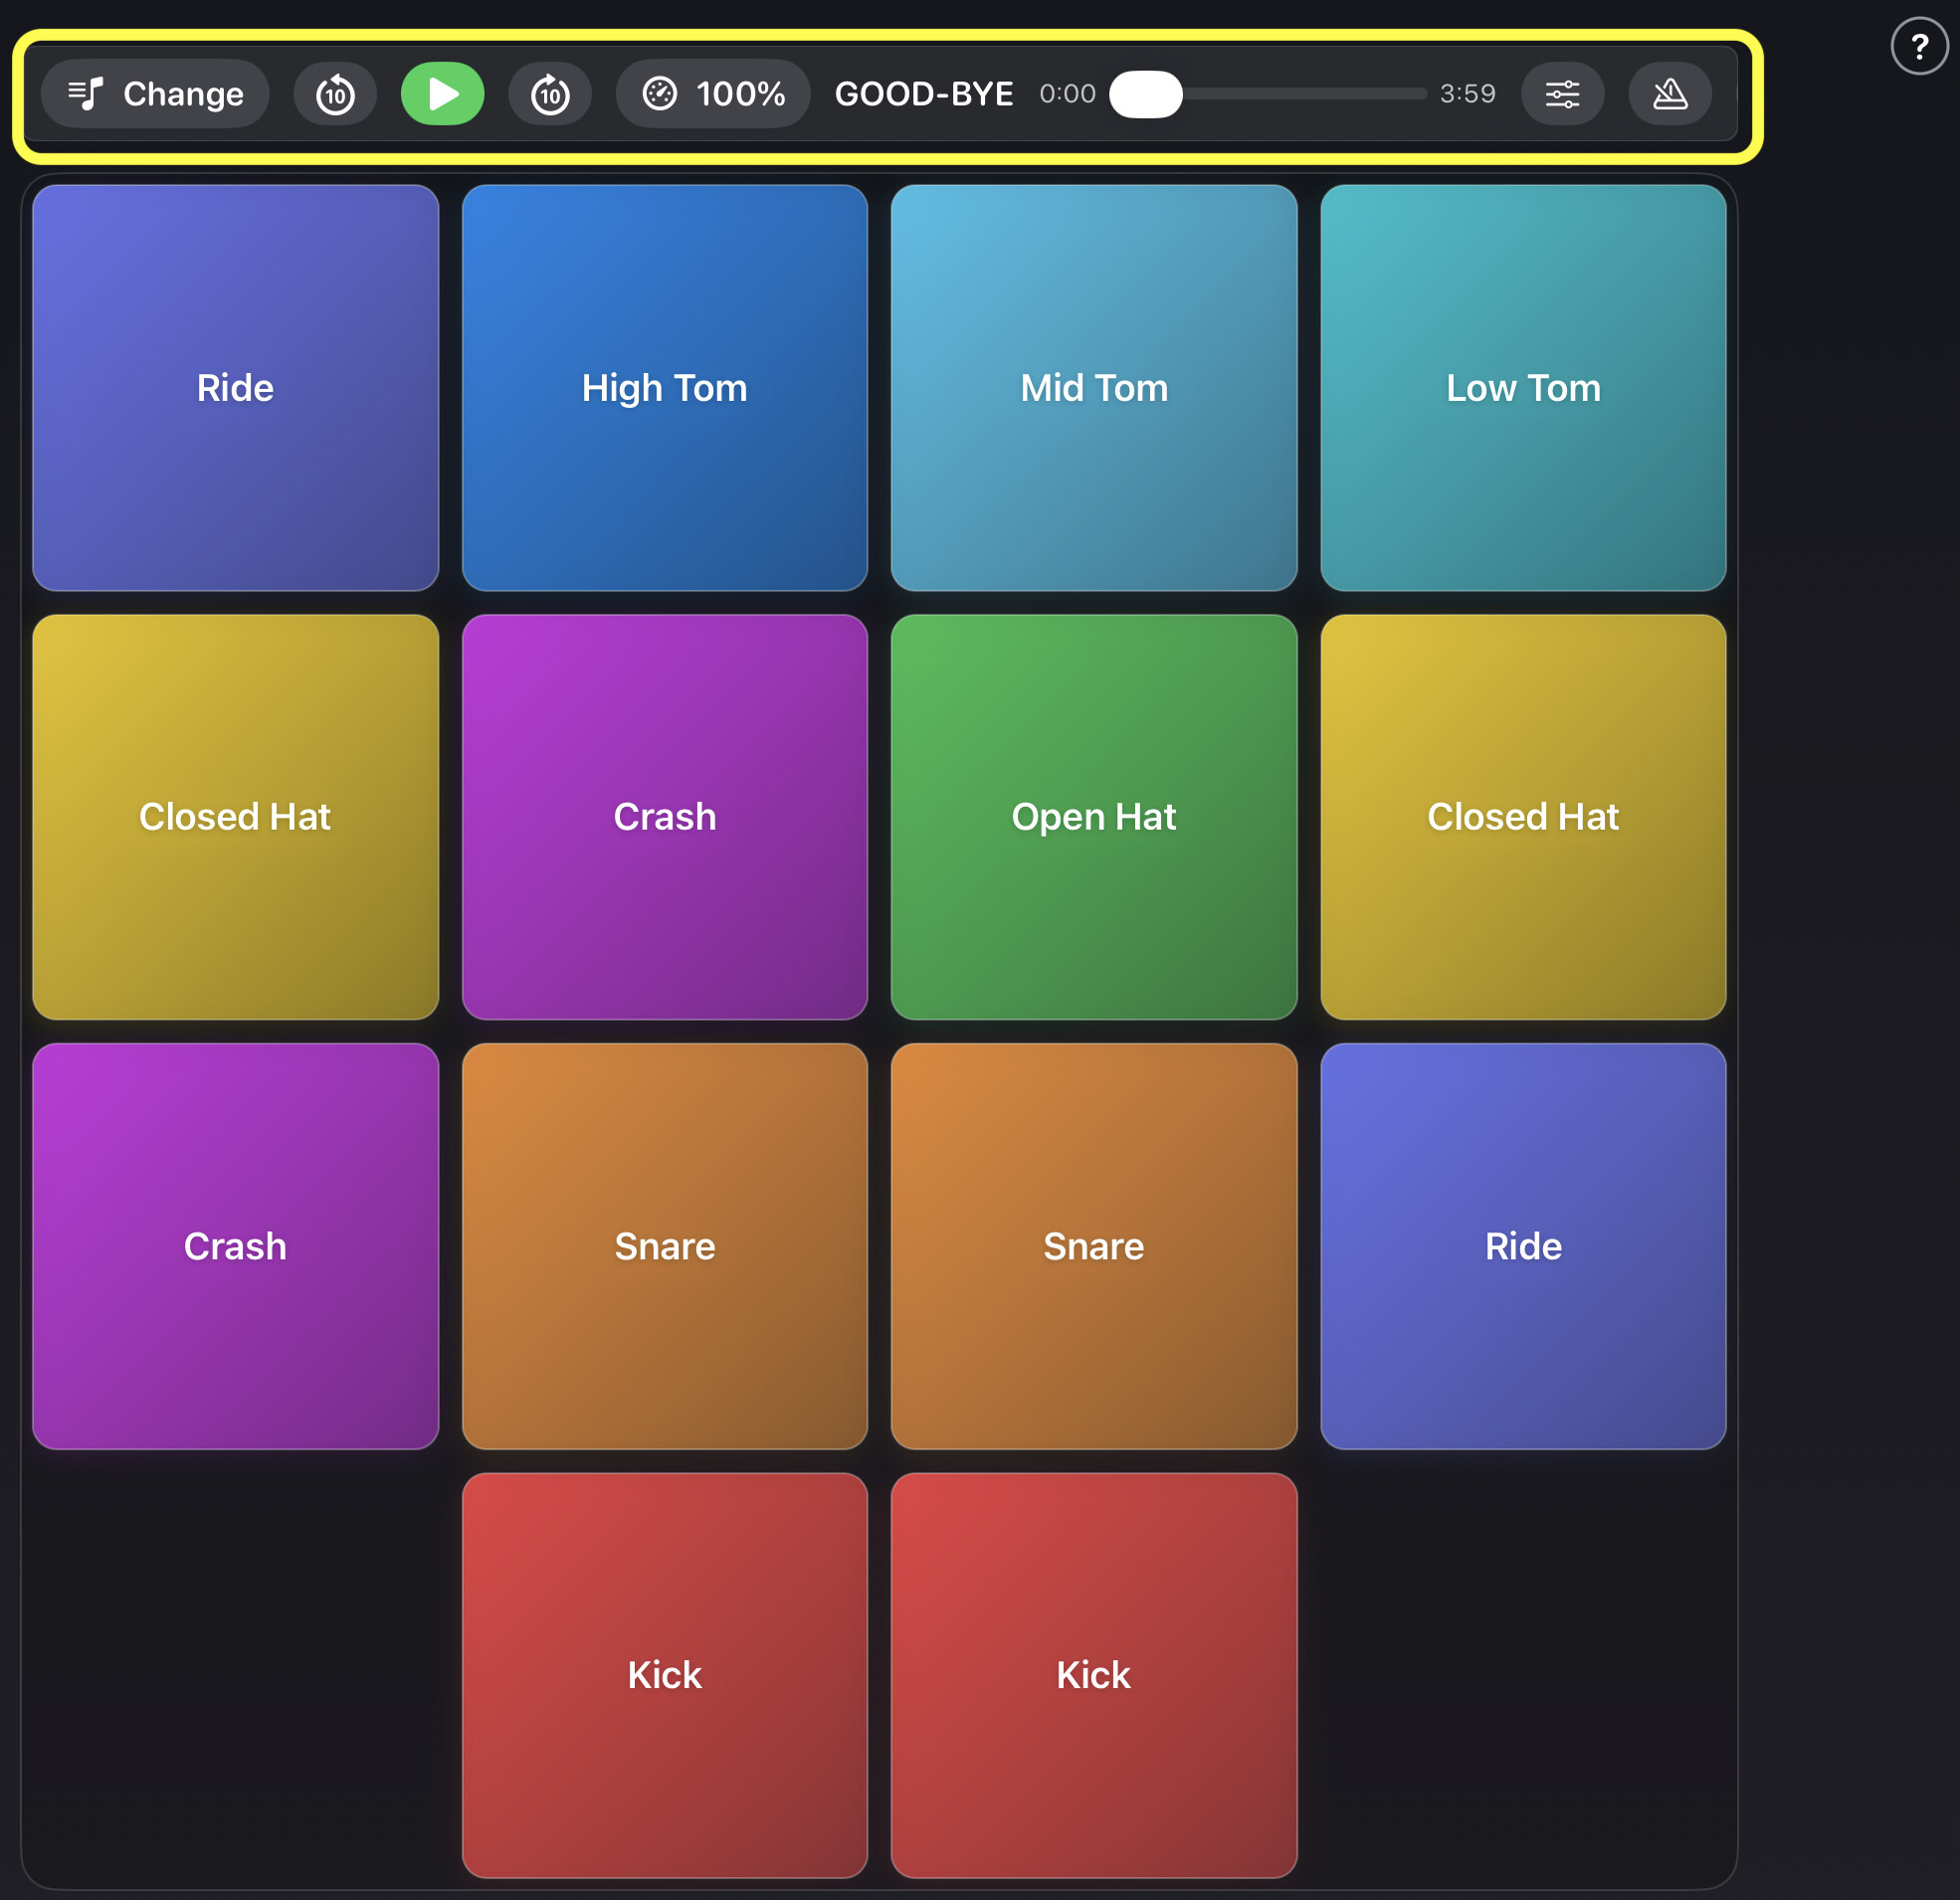
Choose a song from your Apple Music library and layer drums on top. The transport bar in the music row gives you everything:
- Play / pause
- ±10 s skip buttons
- Scrubber to jump to any moment, with current and total time
- Playback speed menu — 50%–100% in 5% steps, pitch preserved. Each song remembers its own speed.
- Volume Mix sheet — balance drum and song volumes independently.
Tempo & kit
- Metronome: 40–200 BPM, 1–12 beats per measure.
- Kit picker in the metronome bar and the music bar — switch kits without leaving Play.
- Pad display scale: 50%–100% — useful on iPhone or when you want larger targets.
Fullscreen
Expand the pad to fill the entire screen. The tab bar hides (Compact environment) and the "?" button fades out. Fullscreen metronome and music bars offer the same kit picker, transport, seek, speed, and mix controls.
Control reference
| Icon | Name | What it does |
|---|---|---|
| Metronome | Start or stop the click track. | |
| Backing Track | Play along with songs from your Music library. | |
| Drum Kit | Switch between saved drum kits. | |
| Tempo (BPM) | Drag up/down to adjust the metronome speed. | |
| Beats per Measure | Set the time signature (e.g. 4/4, 3/4). | |
| Full Screen | Expand the pad to fill the entire screen. |
4. Pad Edit mode
Shape pads, place them anywhere, assign sounds. This is the heart of "layout freedom."
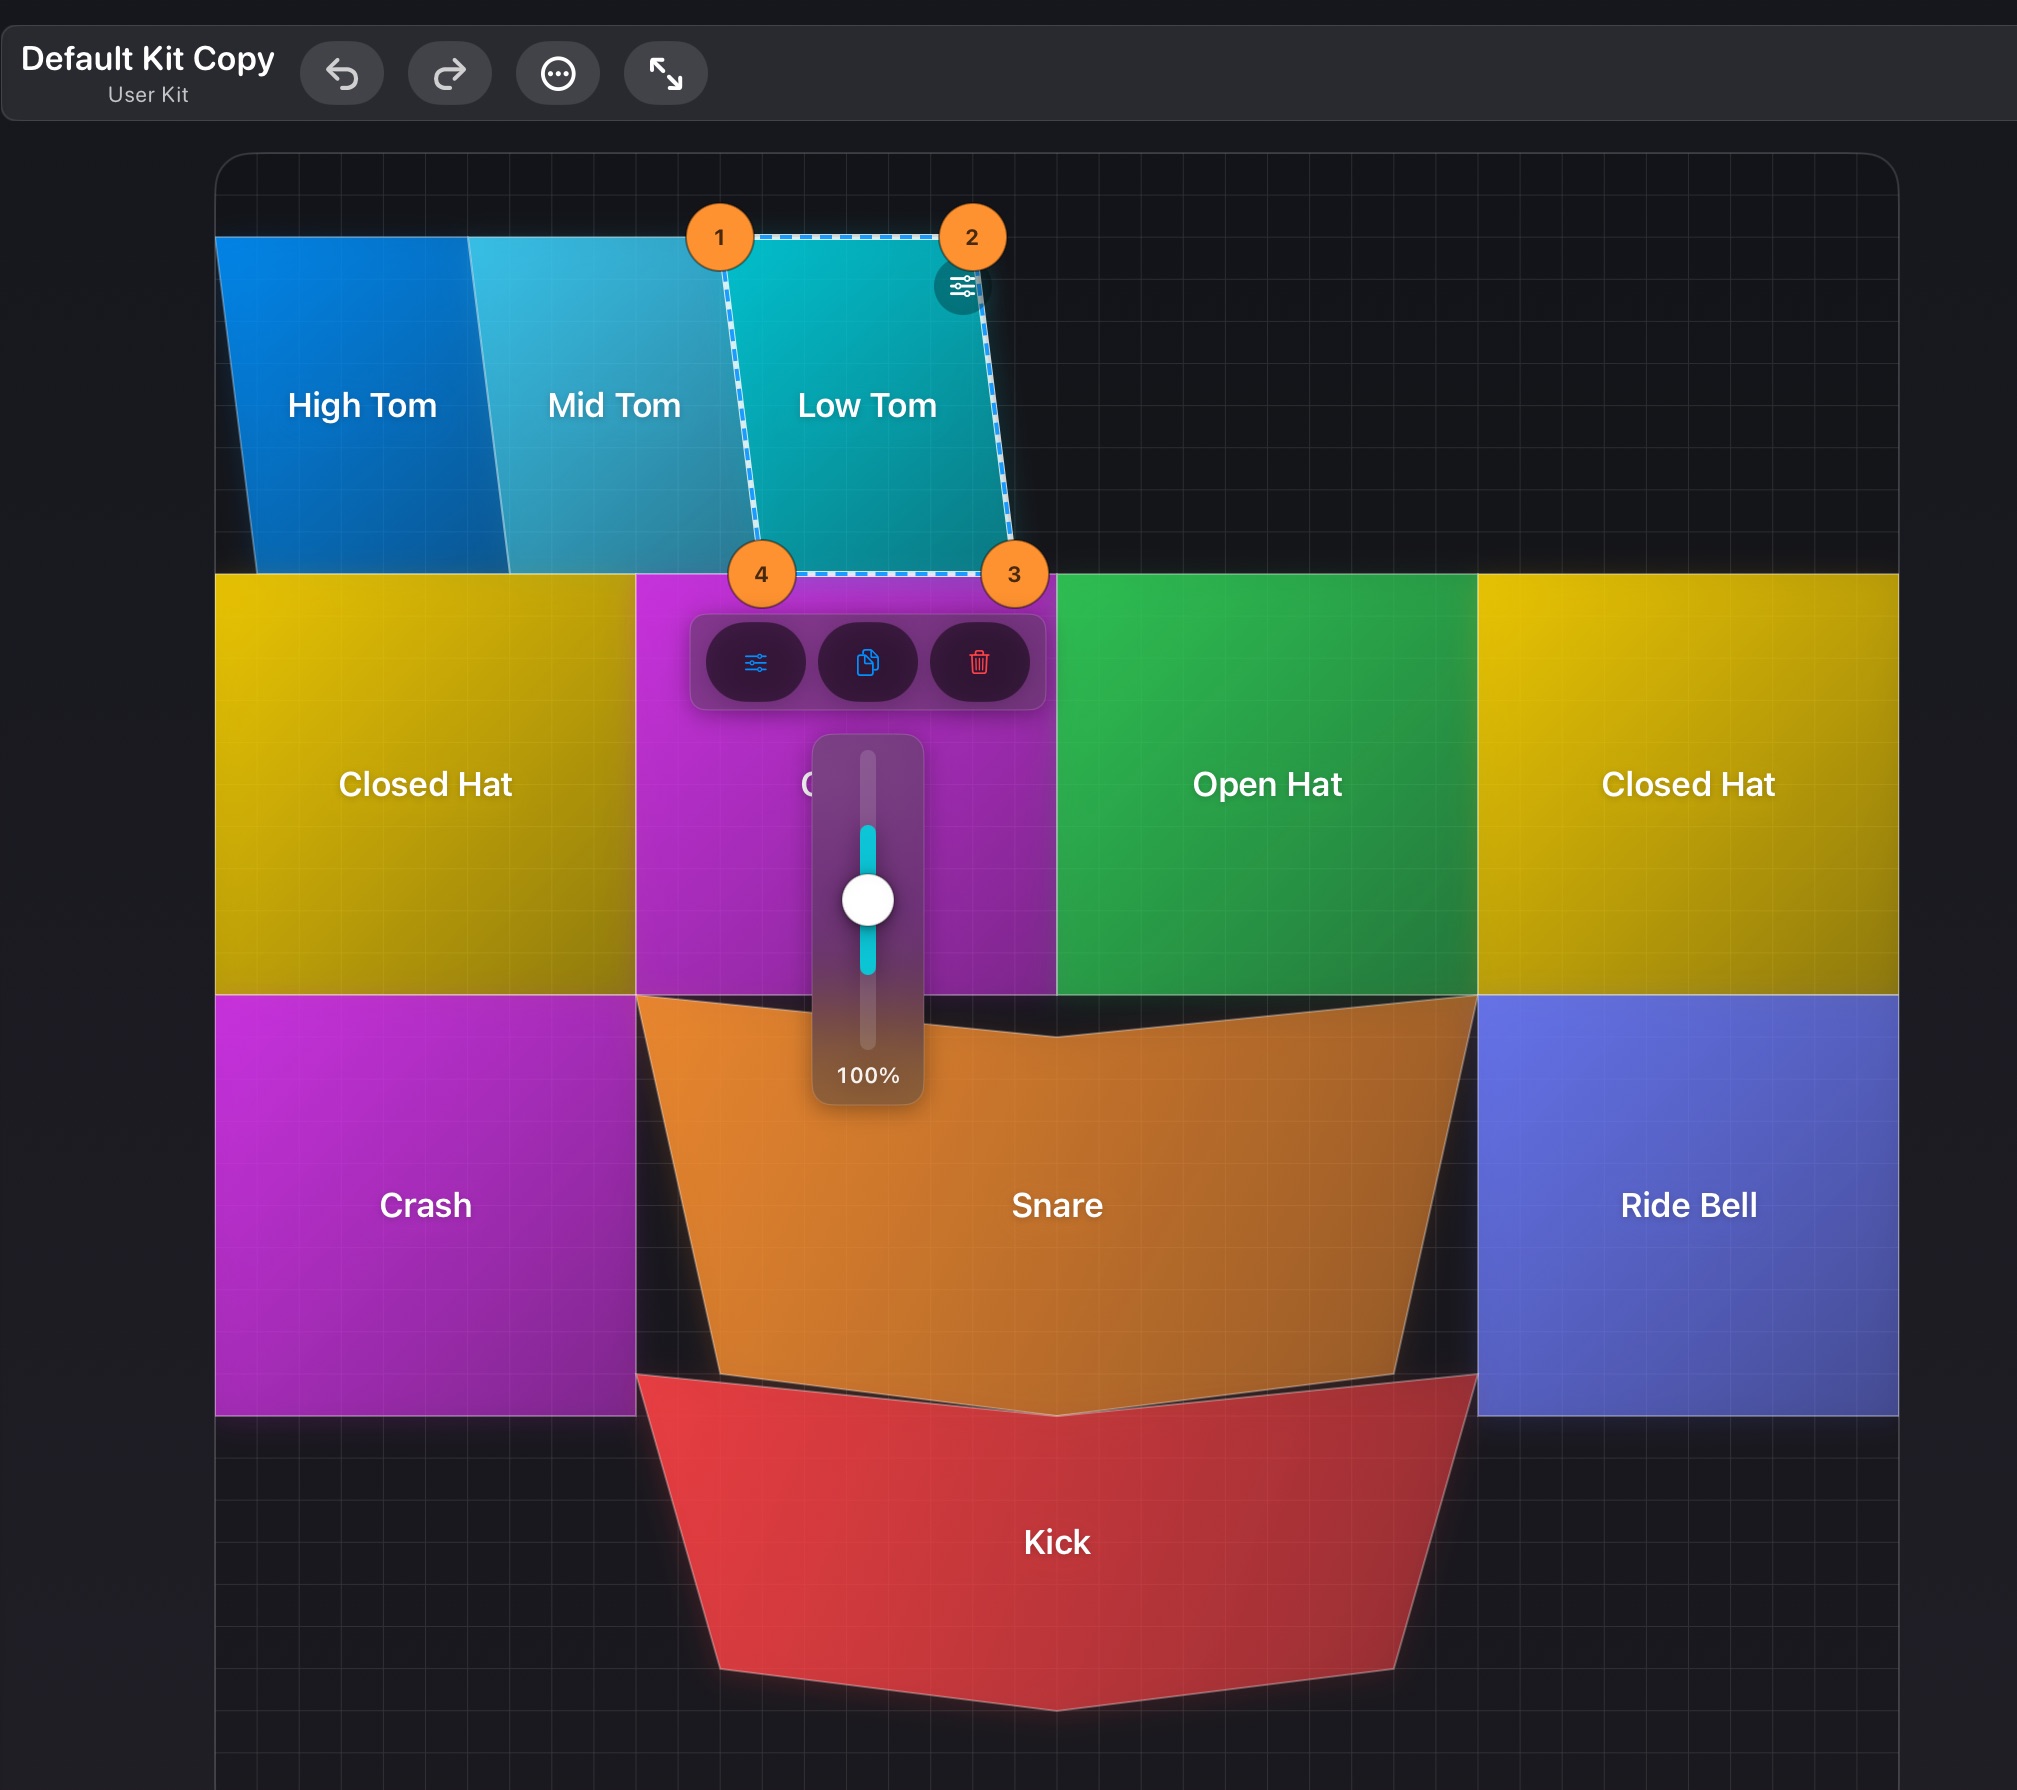
The default kit is read-only. It cannot be deleted, edited, or cleared — those controls are disabled while it is selected. To edit, use Duplicate Kit first to create an editable user copy. Pad operations, Rename Kit, and Grid Settings take effect only on a duplicated user copy.
Selecting and editing a pad
- Tap a pad to select it. Selection handles appear.
- Drag the pad to move it, or drag a vertex handle to reshape it — both are always available while the pad is selected. Use the floating menu (see the reference below) for details and other actions.
- Tap a blank area of the grid to deselect.
Reshaping a pad
Pads are free-form polygons with 3–10 vertices. Drag the vertex handles to edit the shape. Make the kick large and round, the snare wide and horizontal, the hi-hat small and compact — L-shapes, trapezoids, diamonds, anything.
Pad properties
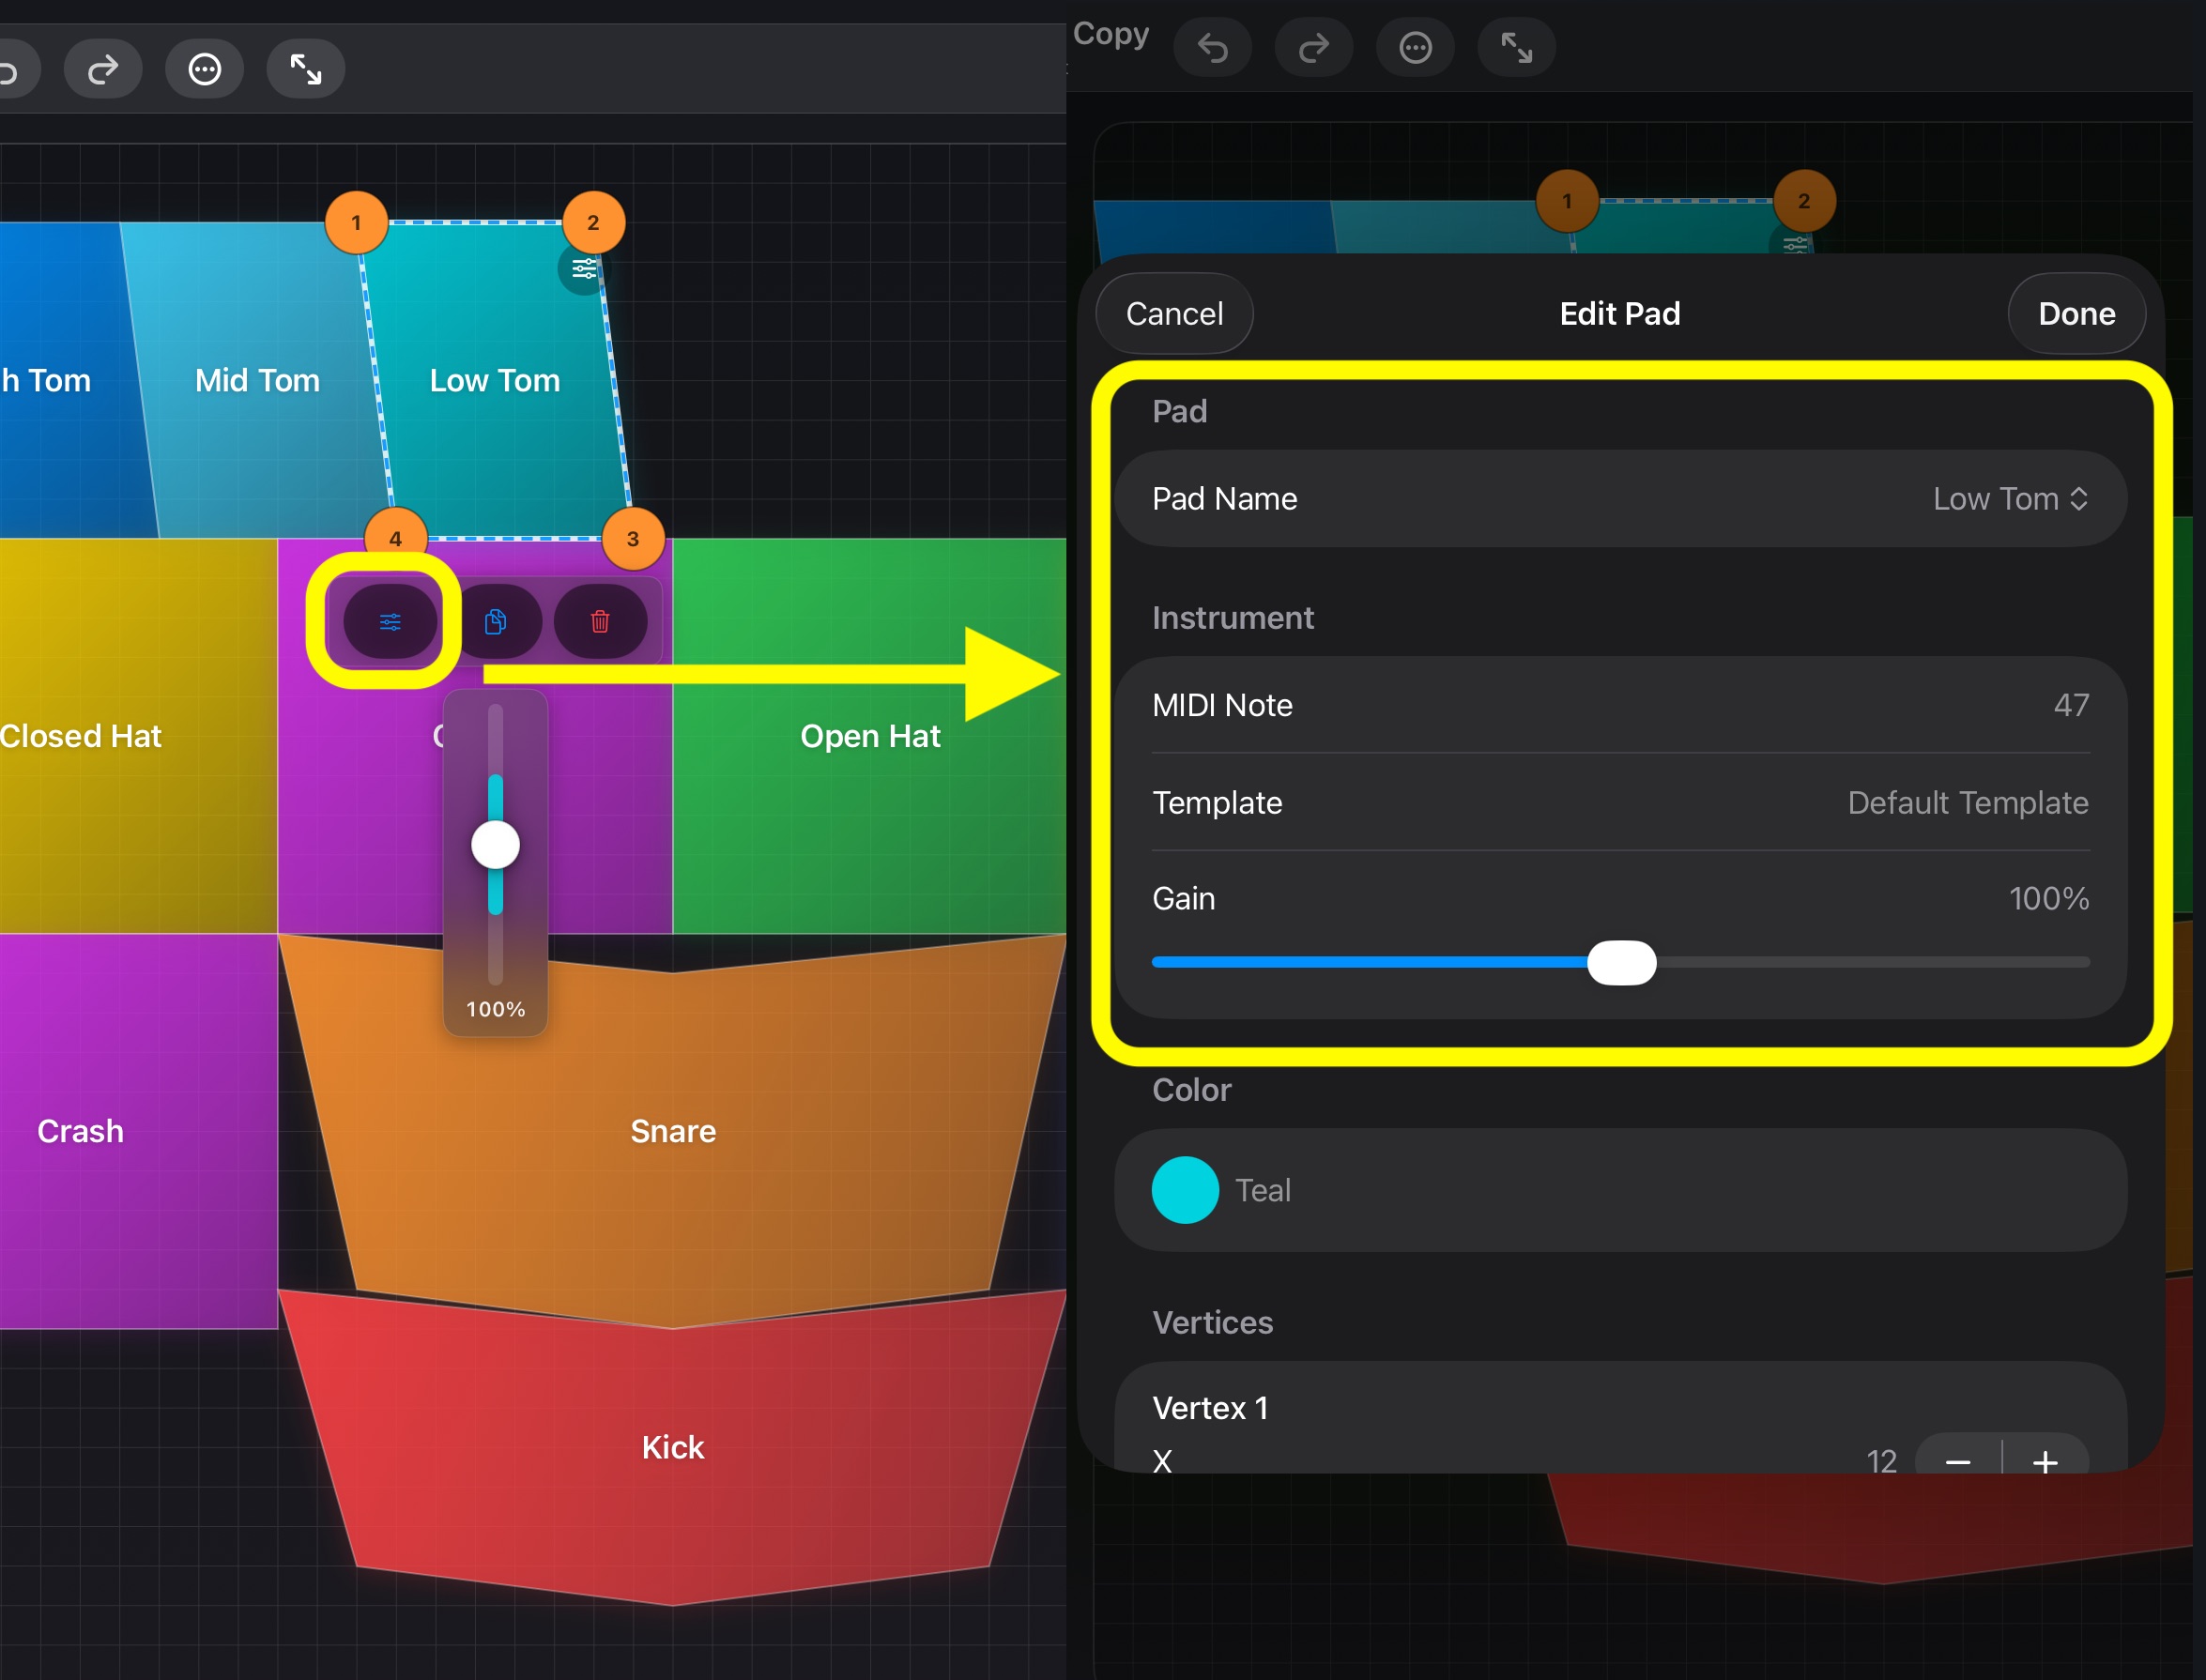
Open Pad Details on a selected pad to edit:
- Name
- Sound source — built-in sample, SF2 region, or AUv3 plugin (see §7 Sounds)
- MIDI Note — chosen via the active drum map (see §9 MIDI & drum maps)
- Gain — numeric field plus a vertical fader with throttled live audition
- Color
- Finger type — for velocity calibration (Thumb / Finger / Pinky)
AUv3 pads
When a pad's sound source is an AUv3 instrument, Pad Details also exposes:
- Edit Plugin — opens the plugin's parameter view to design sounds or pick factory presets. Adjustments save with the kit.
- MIDI settings — Channel, Program Change, CC#1, CC#74.
- Note-Off behavior — how the plugin responds when you lift your finger.
- CC mapping.
- Audition sheet — scans the plugin for mapped notes (playing each one and detecting which actually produce sound), then pre-toggles them so you can confidently pick a starting note for the pad. Especially handy for large sample-based instruments.
SF2 pads
For SoundFont-based pads, "Browse Sounds" opens a browser that lists every sample inside the SF2 — key number, note name, sample name — each with a one-tap preview.
Templates
Apply a template to a single slot or to the entire kit. The active template name appears in the grid summary bar; a checkmark marks it in the template picker. See §8 Settings → Pad Edit → Templates to create templates manually or auto-generate one from an SF2.
Undo / redo
Every pad and kit edit is recorded on a snapshot stack. Undo and Redo are always one tap away in the toolbar.
Grid & overlap
- Grid size: 4–200 × 4–200. Pads auto-scale.
- Overlap control: allow or warn. If warn is on and overlaps are detected when you switch tabs, a dialog appears.
Kit management
The Kit Menu (ellipsis) covers: Duplicate, Rename, Delete, JSON import/export, manage templates, grid settings, New Empty Kit, Share Layout QR, Scan QR (see §10 Files & sharing).
Control reference
| Icon | Name | What it does |
|---|---|---|
| Undo | Revert the last pad or kit edit. | |
| Redo | Reapply the last undone edit. | |
| Kit Menu | Duplicate, rename, delete, import/export kit, manage templates, grid settings, QR sharing, and more. | |
| New Pad | Add a new pad to the kit. | |
| Paste Pad | Paste a previously copied pad from the blank area. | |
| Pad Details | Edit pad name, sound, color, gain, MIDI note, and more. | |
| Edit Plugin | Open the AUv3 plugin editor for the selected pad. | |
| Copy | Copy the selected pad for later pasting. | |
| Delete | Remove the selected pad from the kit. |
5. Training mode
Rhythm-game feel meets serious drum practice.
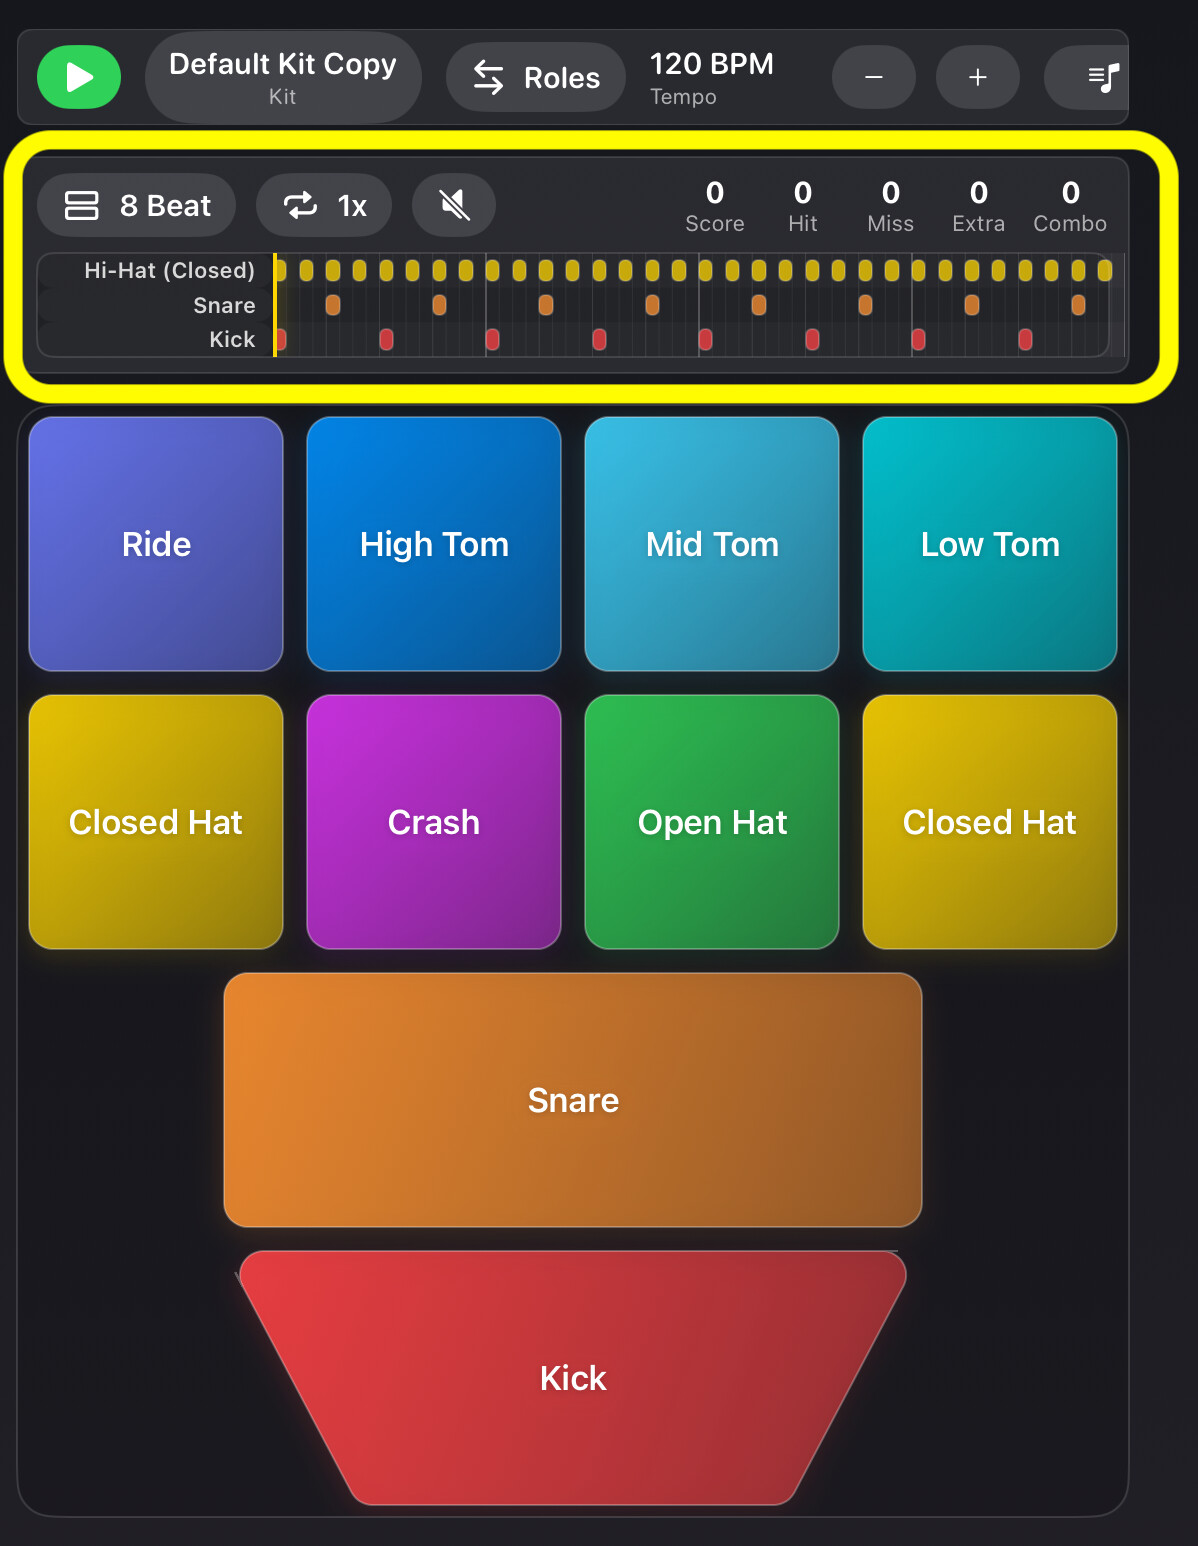
Choosing a chart
Open the chart browser (3 levels):
- Built-in / My Patterns — bundled charts or ones converted from your Sequencer patterns.
- Category — 10 genres: Basic, Rock, Pop, Funk/Dance, Blues/Shuffle, Jazz/Swing, Latin, Reggae/Ska, Technique, Fill Practice.
- Chart — each shows a difficulty rating (★1–5) and BPM. Tap the info button for a detail screen with a complexity radar chart, per-BPM difficulty table, and endurance bonus.
100 bundled charts ship with the app.
Difficulty & scoring
- ★1–5 difficulty — derived from pattern complexity (5 factors) plus a per-BPM speed score.
- Endurance bonus — patterns longer than 4 bars grant up to +10 points.
- Ranks: S (95+) / A (85+) / B (70+) / C (50+) / D. Each rank has its own result fanfare.
Playing
- Tap Practice to start. A one-bar count-in plays first.
- Notes flow across the screen; tap the matching pads in time.
- Real-time judgment: Perfect / Good / Early / Late / Miss / Extra Hit.
- Consecutive Perfects build your combo and raise your score.
- Set a repeat count (1–8) to drill a chart multiple times in a row.
Roles
Charts and patterns speak the language of roles — kick, snare, hats, toms, cymbals — rather than raw MIDI notes. That is why imported kits play along with built-in content right away. Tap ⇄ Roles to preview exactly how each voice lands on your pads; see Imported kits & roles for the full picture.
Results
At the end of each run, the results screen reveals (see §11 Results & statistics for detail):
- Score, combo, and judgment breakdown
- Timing heatmap — today vs. all-time tendencies
- Per-pad stats — PAD OF THE DAY and FOCUS FOR NEXT
- Session story — a two-sentence, plain-language summary
- Streak and weekly summary
- Smart retry — next-action suggestions: Speed Up / Replay / Slow Down / Try Another
- Save Recording — keep your taps and replay them later.
Recording & playback
Every run is recorded automatically — your tap timings are captured as you play, with no extra steps.
- Ephemeral by default — the recording lives only for the current run. Start a new run and it's cleared automatically.
- Save Recording on the results screen keeps the current run. Recordings are stored on-device and survive app restarts.
- Recordings browser — tap the Recordings button in the toolbar to browse saved takes. Each row shows the pattern name, difficulty (★), and BPM.
- Faithful playback — tapping a recording restores its original chart and BPM and plays your taps back in sync with the note strip and pad flashes. You can't play along during playback, so it's purely for reviewing your performance.
- Rename or delete recordings from the per-row menu.
Control reference
| Icon | Name | What it does |
|---|---|---|
| Practice | Start or stop the practice playback and note flow. | |
| Drum Kit | Switch between saved drum kits. | |
| Roles | View and adjust how chart voices map to your kit's pads. | |
| Tempo (BPM) | Drag up/down to adjust the practice speed. | |
| Full Screen | Expand the pad to fill the entire screen. | |
| Save Recording | On the results screen, keep the current run's taps for later playback. | |
| Recordings | Browse, play back, rename, and delete saved recordings. |
6. Sequencer mode
Build rhythm patterns step by step.
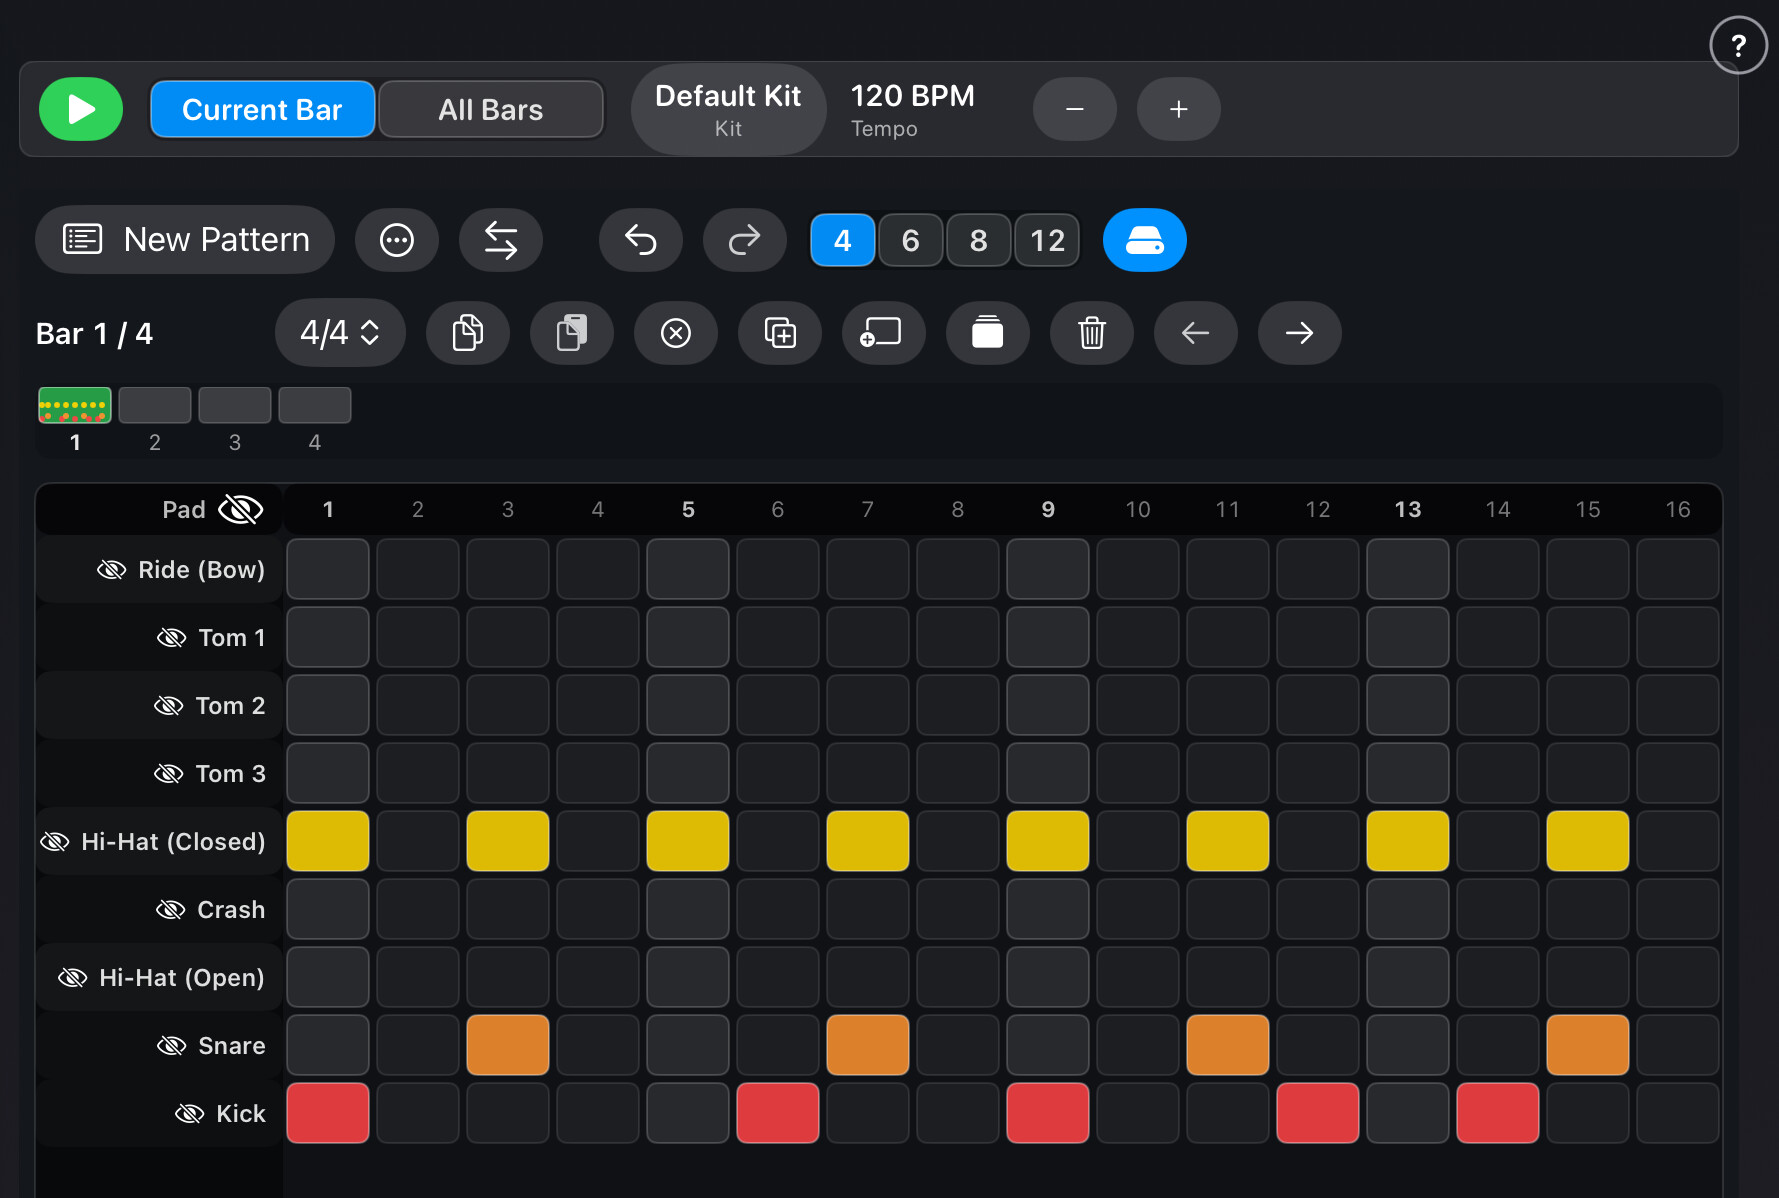
Step input
- Tap steps on the grid to place hits. Tap again to remove.
- Four grid resolutions: 16th, 16th triplet, 32nd, 32nd triplet — shown as 4 / 6 / 8 / 12 divisions per beat.
- Reorder pads by drag and drop to arrange rows to your liking.
Bars
- Time signature per bar — choose from 3/4, 4/4, 5/4, or 7/4.
- Bar operations: copy, paste, clear, duplicate, fill all bars (copies the current bar everywhere in one tap), add empty bar (up to 64 bars), delete, move.
- Bar navigation: Previous / Next buttons, or swipe horizontally on the grid (an edge-overrun detector snaps the swipe into a bar change at a 44 pt position or 500 pt/s velocity threshold).
- A minimap gives you a bird's-eye overview of the whole pattern.
Playback
Next to the Play / Stop button, switch between Current Bar and All Bars playback — no digging through menus. Rows can be shown or hidden via hiddenSequencerPadIDs if you want to focus on a subset.
Patterns & folders
- Create, save, rename, duplicate, delete patterns.
- Organize patterns into a hierarchical folder tree with drag-and-drop move; create, rename, delete folders.
- Import and export pattern JSON or pattern group JSON (see §10 Files & sharing).
MIDI export
Export any pattern as a Standard MIDI File (Format 0) via the system share sheet — bring your beats straight into a DAW.
Send to Training
Turn any beat into a practice pattern. Convert "that rhythm I always want to play" into a drill — a level of freedom unique to this app.
Control reference
| Icon | Name | What it does |
|---|---|---|
| Playback | Start or stop the sequencer. | |
| Patterns | Browse, select, and organize patterns in folders. | |
| Save | Save the current pattern changes. | |
| Pattern Actions | Rename, duplicate, move, export as MIDI, or delete. | |
| Roles | View how pattern voices map to your kit's pads. | |
| Undo | Revert the last edit. | |
| Redo | Reapply the last undone edit. | |
| Resolution | Switch between 16th, 16th triplet, 32nd, or 32nd triplet grid divisions. |
7. Sounds & sound sources
Three kinds of sound sources: built-in samples, SF2 SoundFonts, and AUv3 plugins.
Built-in drum samples
Twelve sounds ship with the app — kick, snare, hi-hats, toms, crash, ride, china and ride bell — ready to play with no setup.
SF2 SoundFonts
- Import an SF2 file and FingerDrumPad treats it as a sound source.
- Browse Sounds: open any SoundFont to see every sample inside — key number, note name, sample name — each with a one-tap preview. Find the sound you want by ear.
- New Template from SoundFont: every drum sound in the SF2 is auto-laid-out on pads. Sounds matching the GM drum map get appropriate colors, finger types, and names — the base of a new kit, complete in seconds.
Imported a kit in an unusual layout? Its sounds are matched to charts and patterns automatically through drum roles — nothing else to configure.
Imported kits & roles
Why imported soundfonts work with built-in charts and patterns — no extra setup.
Imported kits rarely follow the general-MIDI layout: your kick may live on note 60 under the name “BD”, where a chart written for note 36 would stay silent. FingerDrumPad bridges the gap with drum roles — every note and pad is classified into one of 19 voices (Kick, Snare, three hi-hats, Toms 1–5, Crash, Ride, Splash, China, Cowbell, Side Stick, Clap, …):
- Standard GM notes map directly — 36 becomes Kick, 38 becomes Snare, and so on.
- Toms are ordered by pitch. The GM tom range is ranked highest-to-lowest within your kit or pattern, so three toms become Tom 1–Tom 3 automatically — sound names never matter.
- You can override anything via Pad Details › Drum Role.
| Sound name | MIDI note | Assigned role |
|---|---|---|
| “Kick 22” | 36 | Kick (GM direct match) |
| “Rack Tom 2” | 47 | A tom — its number follows pitch order across all toms found |
| “BD-808” | 60 | Other — assign manually in Pad Details |
Training charts, sequencer patterns, and saved recordings all route through roles, so they keep working whichever kit you switch to. Tap ⇄ Roles in Training or the sequencer any time to audit the mapping — unmatched voices are flagged until you fix them.
AUv3 instrument plugins
Any AUv3 instrument plugin installed on this iOS device (as an Audio Unit extension, not just the host app) can be used directly as a pad sound source. Play synths from drum pads, lay out piano scales on pads — assign a different plugin to each pad if you like.
- Edit Plugin opens the plugin's parameter view to design sounds or pick factory presets. Your adjustments save with the kit.
- MIDI settings per pad: Channel, Program Change, CC#1, CC#74.
- Note-Off behavior and CC mapping configurable per pad.
- Audition sheet: scans the plugin for mapped notes by playing each one and detecting which actually produce sound, then pre-toggles those mapped notes — so you can confidently pick a starting note. Especially handy for large sample-based instruments where the note layout is a mystery.
8. Settings
Sections are ordered to mirror the tab order — General → Play → Pad Edit → Training → Sequencer → About — so you can find a setting next to where you use it.
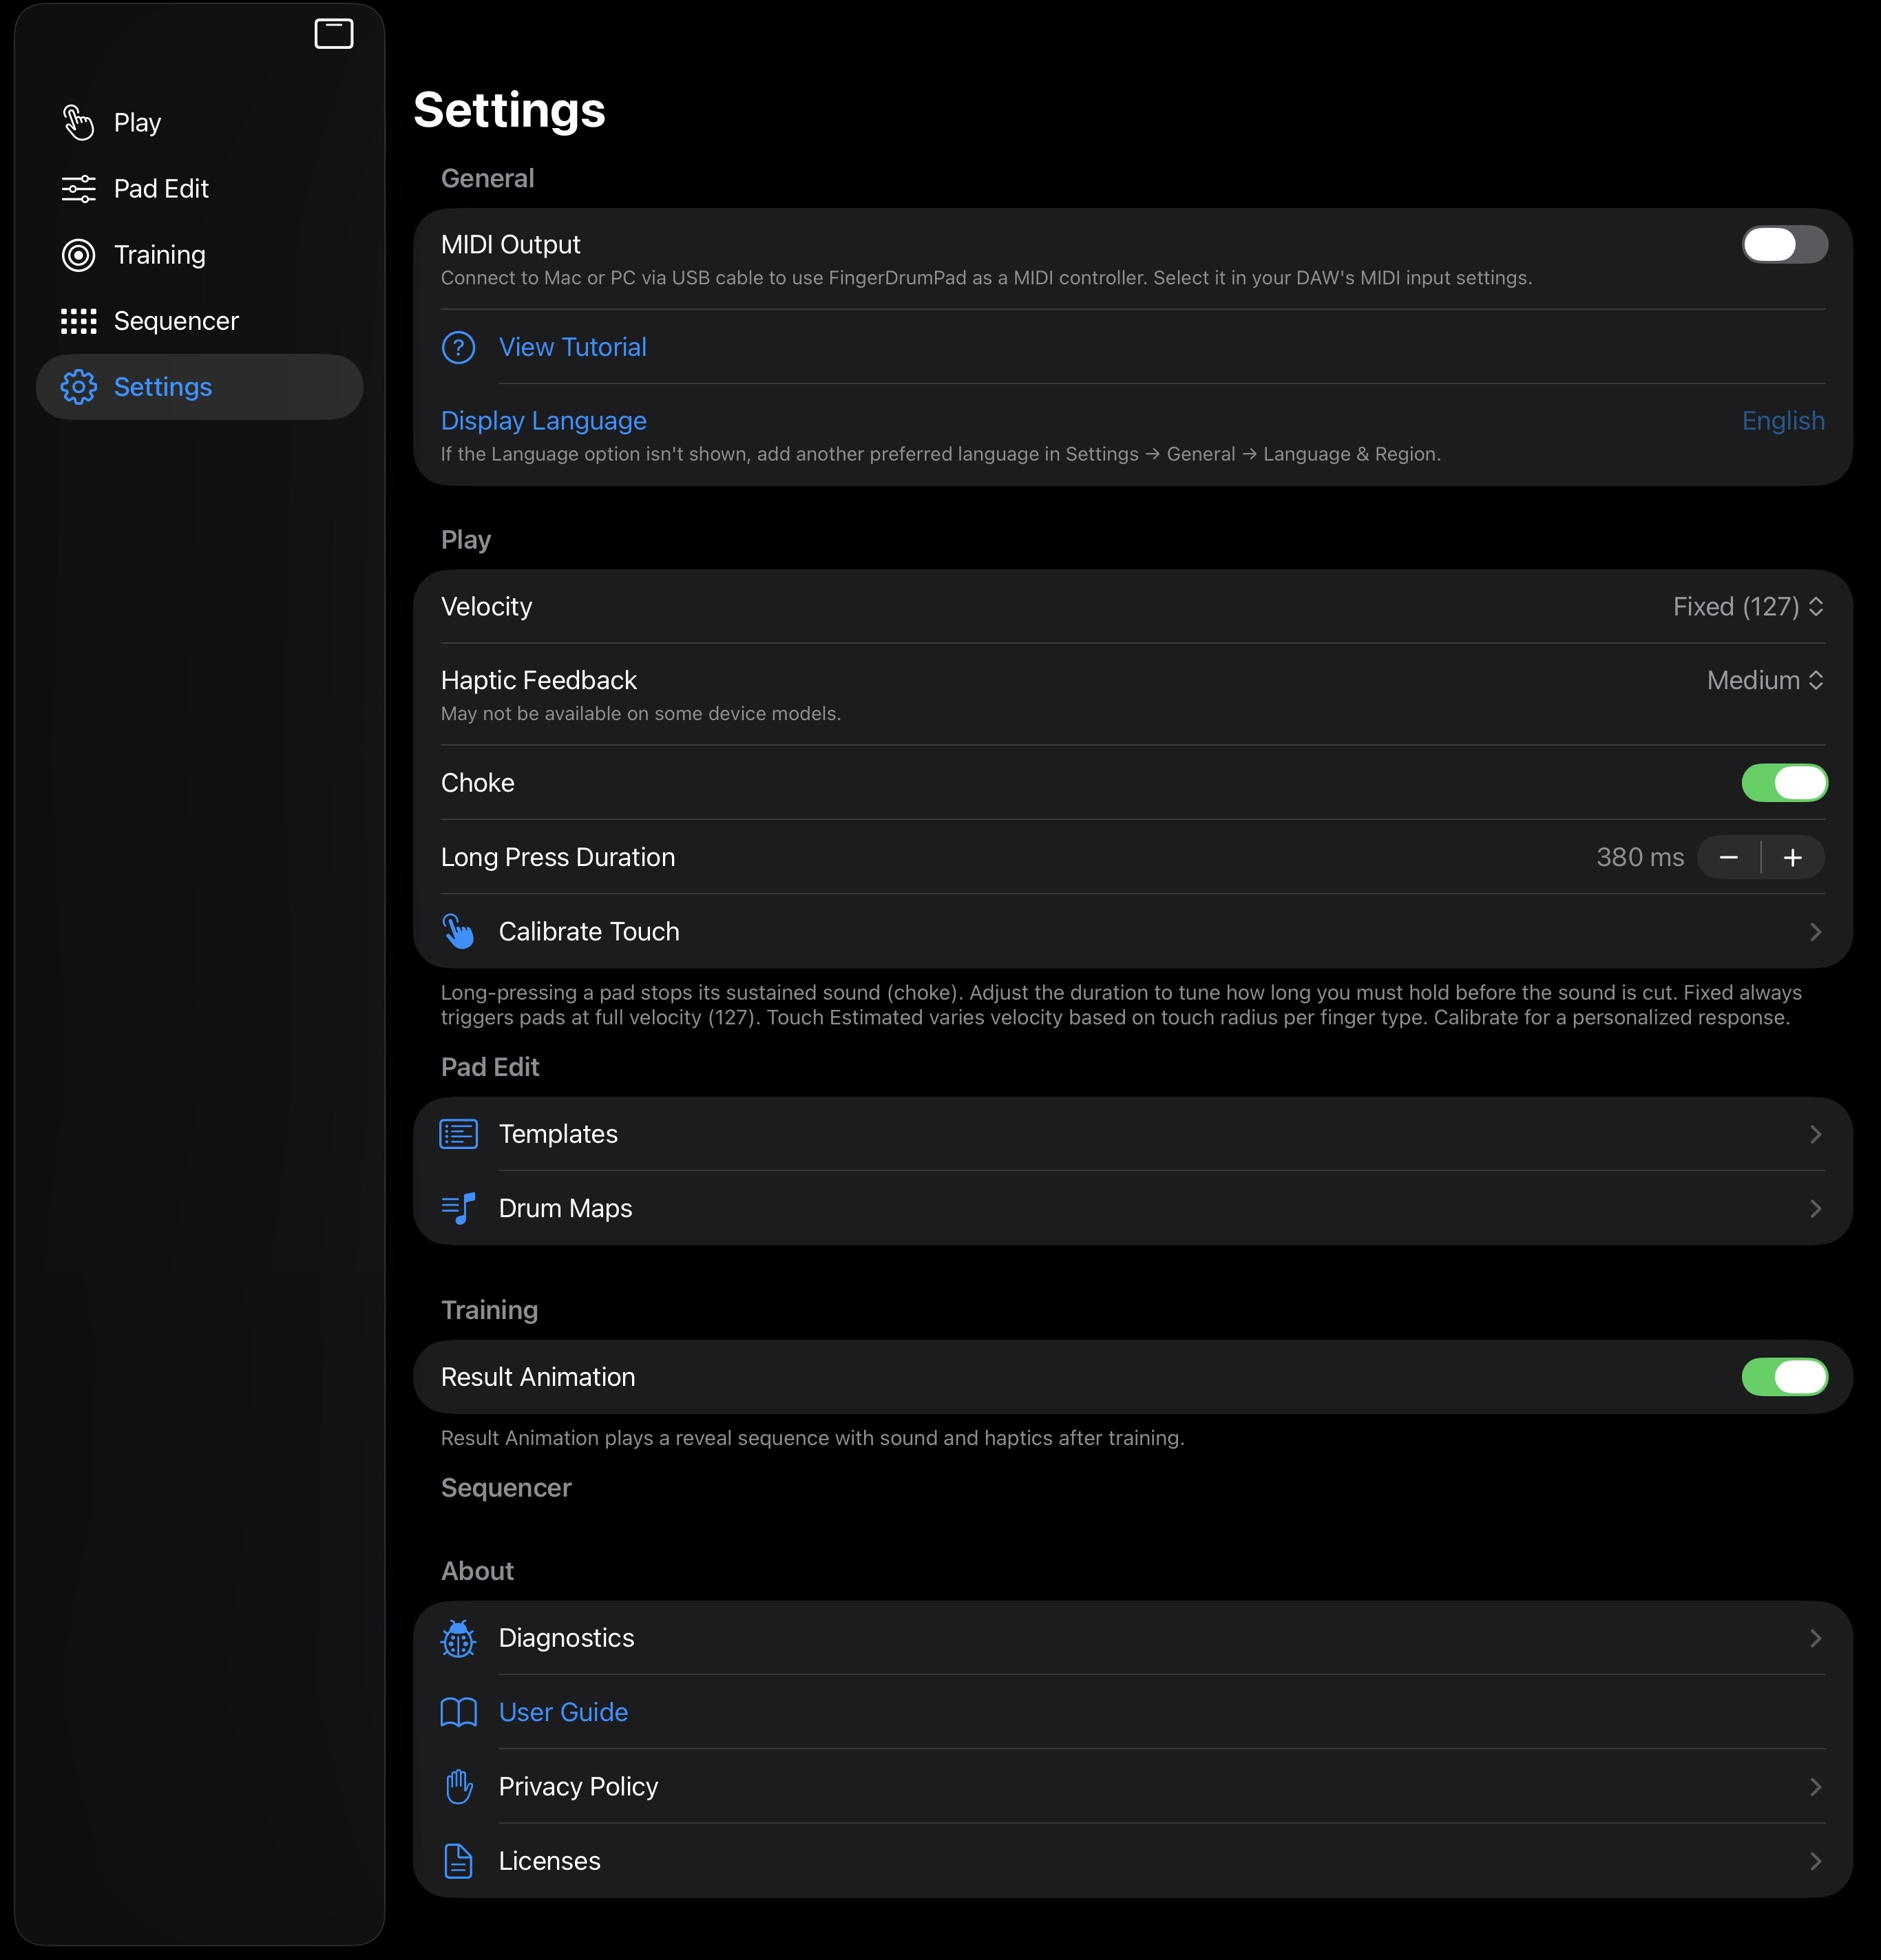
General
- MIDI Output — enable/disable, channel (1–16), destination device, connection status. When enabled, the internal sound is muted. See §9 MIDI.
- View Tutorial — re-display the six-page onboarding.
Play
- Velocity — Fixed (127) or Touch Estimated.
- Haptic Feedback — Off / Light / Medium / Heavy.
- Calibrate / Recalibrate Touch — per-finger-type calibration (Thumb / Finger / Pinky). When calibrated, the row shows the calibrated finger summary and offers Recalibrate.
Pad Edit
- Templates — open template management (manual creation + auto-generation from SF2).
- Drum Maps — open custom drum map management.
Training
- Result Animation — toggle the multi-phase score-reveal animation and result sound/haptics.
Sequencer
Reserved — an empty placeholder for future sequencer-related settings.
About
- Diagnostics — opens the Diagnostics screen (privacy preview, Crashlytics toggle, generate/share JSON report). See §12 Diagnostics & privacy.
- User Guide — external link to this online manual.
- Privacy Policy — opens the in-app privacy policy view.
9. MIDI output & external devices
Use FingerDrumPad as a MIDI controller over USB.
Connecting to a Mac
Connecting to a Mac uses Apple's built-in IDAM (Inter-device Audio & MIDI). After a one-time enable in macOS's Audio MIDI Setup, your iPad appears to the Mac as a MIDI device.
- Connect your iPad or iPhone to your Mac with a USB cable.
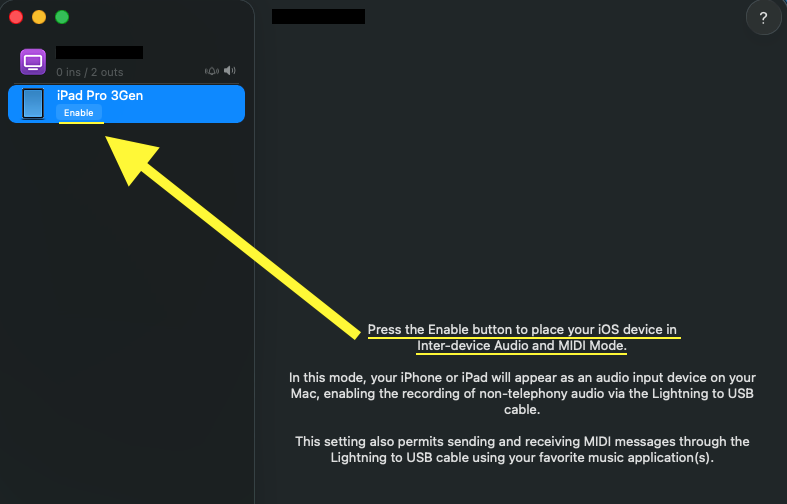
- On the Mac, open Audio MIDI Setup (Applications → Utilities). Your iPad appears with an Enable button — press it.
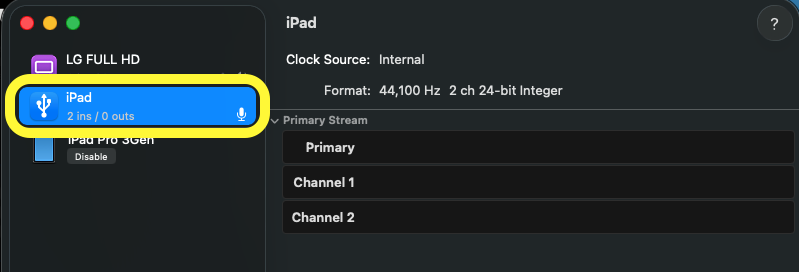
- IDAM activates and the iPad is exposed to the Mac as a MIDI input device (highlighted below).
- In FingerDrumPad, open Settings → General → MIDI Output, turn it ON, and select IDAM MIDI Host as the destination. The status shows Connected (USB).
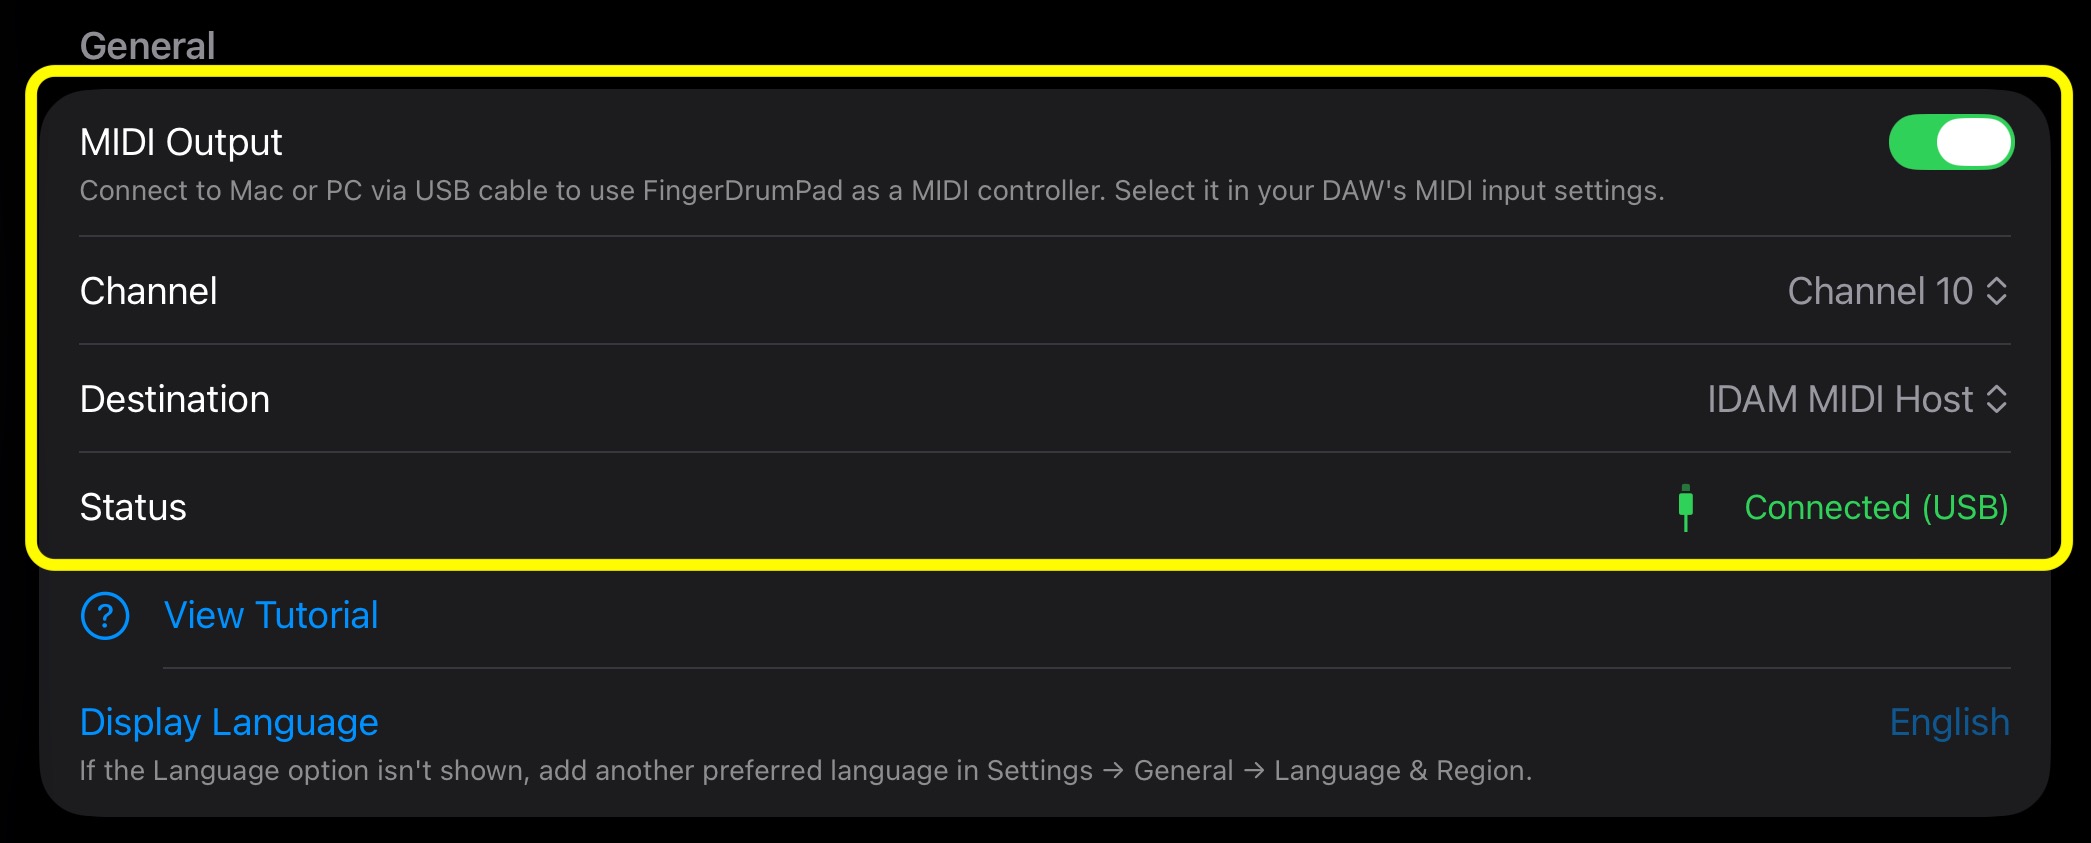
- Optionally pick your transmit channel (1–16). You can switch between multiple destination devices.
Connecting to a Windows PC does not use IDAM — pair the iPad as a class-compliant MIDI device or use a USB-MIDI adapter, following your DAW's iOS MIDI guide.
Internal sound is muted while MIDI output is enabled. Pad performances are sent as MIDI input to your DAW instead of played by the app. Disable MIDI output to hear the app's own sounds again.
Custom drum maps
Customize MIDI Note assignments to your liking. Register different drum maps for models from Roland, Yamaha, and others, then quickly select the right one when editing pads. Find map management under Settings → Pad Edit → Drum Maps.
10. Files, import/export & sharing
Share your kits and patterns through standard iOS share sheets or QR codes.
File-based sharing
.fingerkitfiles carry a complete kit (pads, shapes, sounds, settings)..fingerpatternfiles carry a single pattern or a pattern group.- Tap a file (in Files app, Mail, AirDrop, etc.) and iOS launches FingerDrumPad to import it. The app is registered as the default handler for these file types.
QR code sharing
Kit layouts can be shared as compact QR codes:
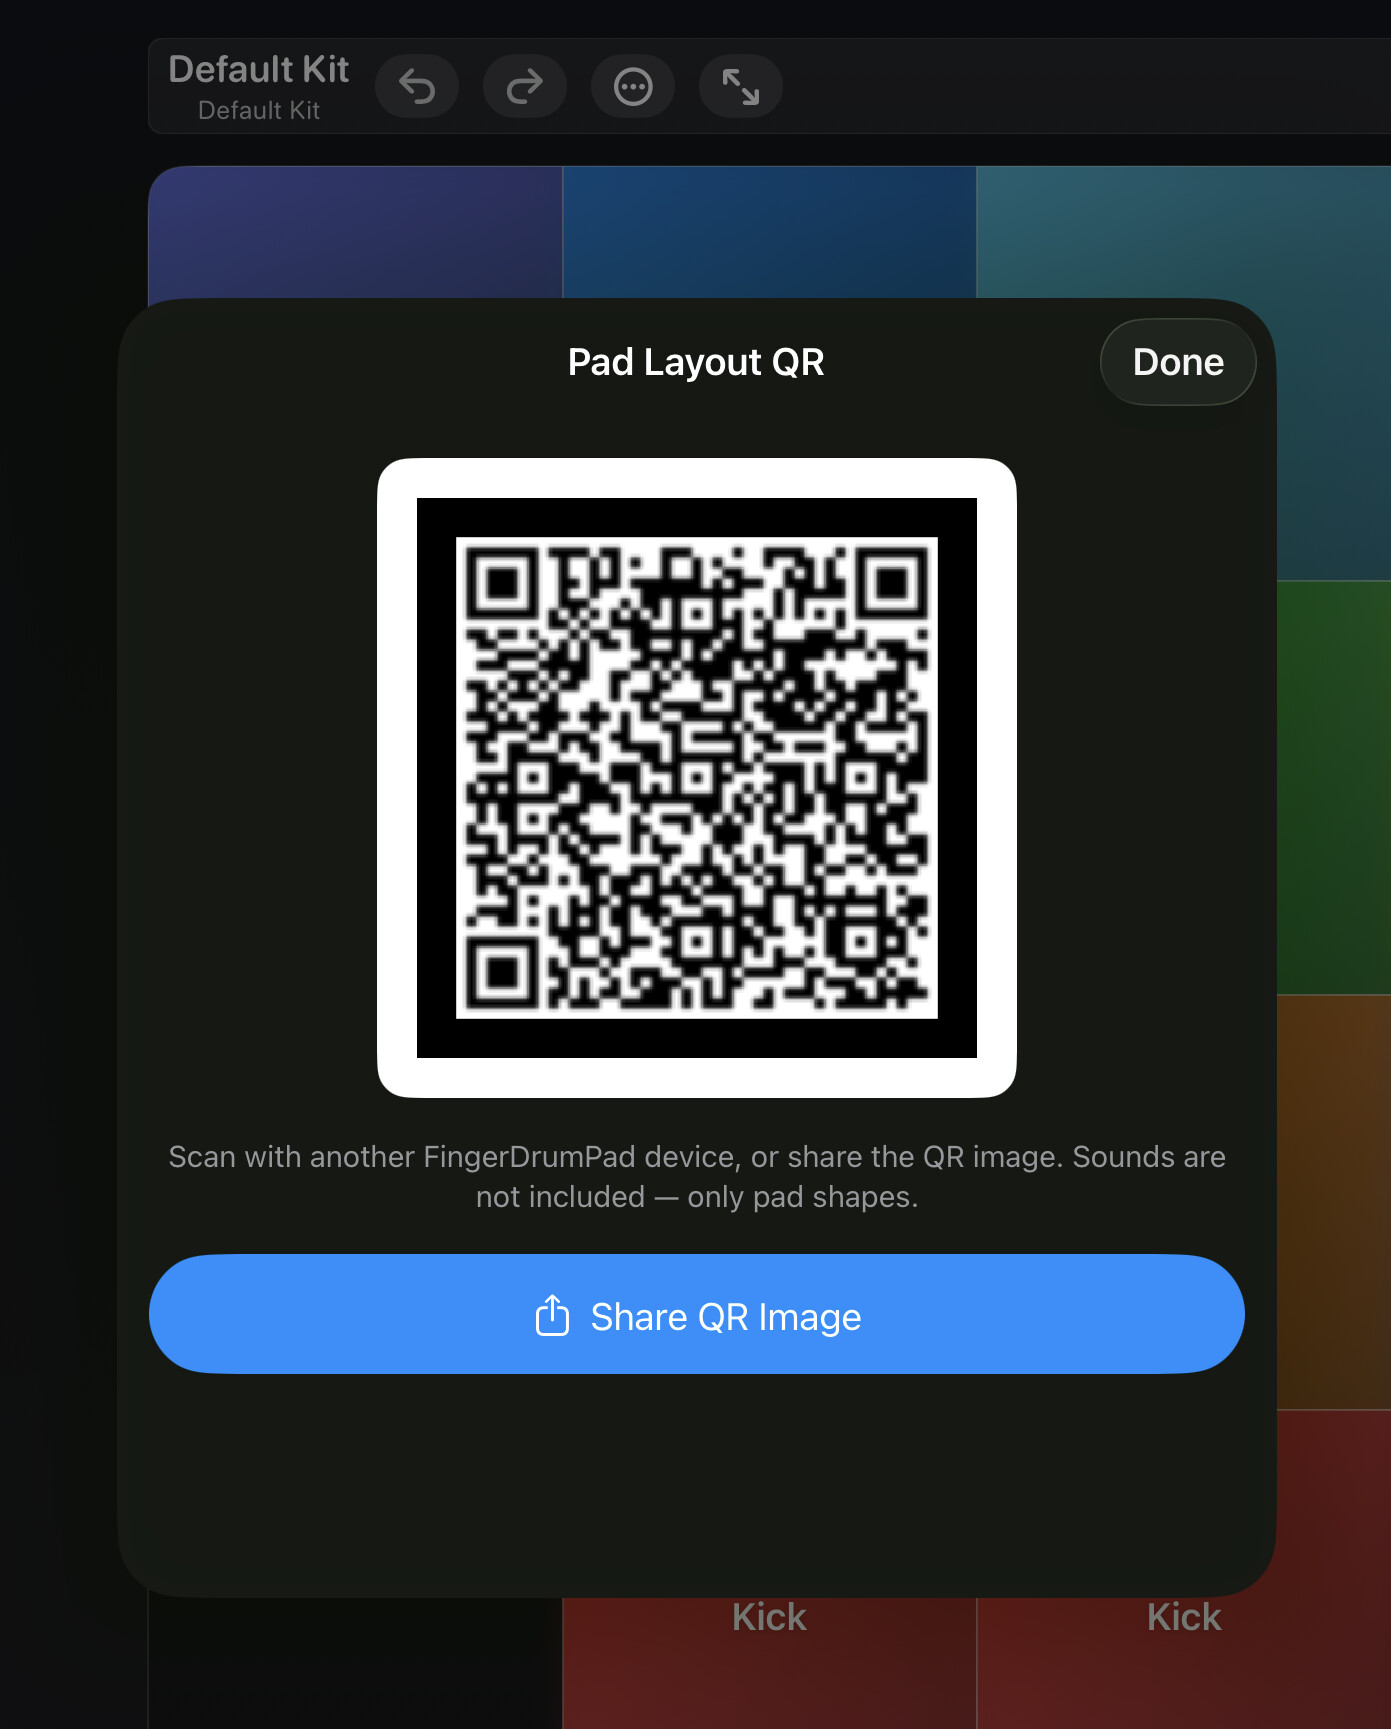
- Share Layout QR — in Pad Edit's Kit Menu. Encodes grid + pad shapes only (a
PadLayoutSnapshot), zlib-compressed, so the QR stays scannable. - Scan QR — in Pad Edit's Kit Menu and the Pattern list. Reads the code through the camera and applies the layout via the same import path as files.
- Patterns have a Share Pattern QR in the row context menu and a Scan Pattern QR in the pattern list.
Advanced JSON (power users)
The original JSON import/export is preserved under an "Advanced JSON" submenu for automation and scripting workflows.
MIDI export
Sequencer patterns export as Standard MIDI Files (Format 0) via the system share sheet — available alongside .fingerpattern in the pattern row's context menu.
11. Practice results & statistics
The results screen turns every run into feedback you can act on.
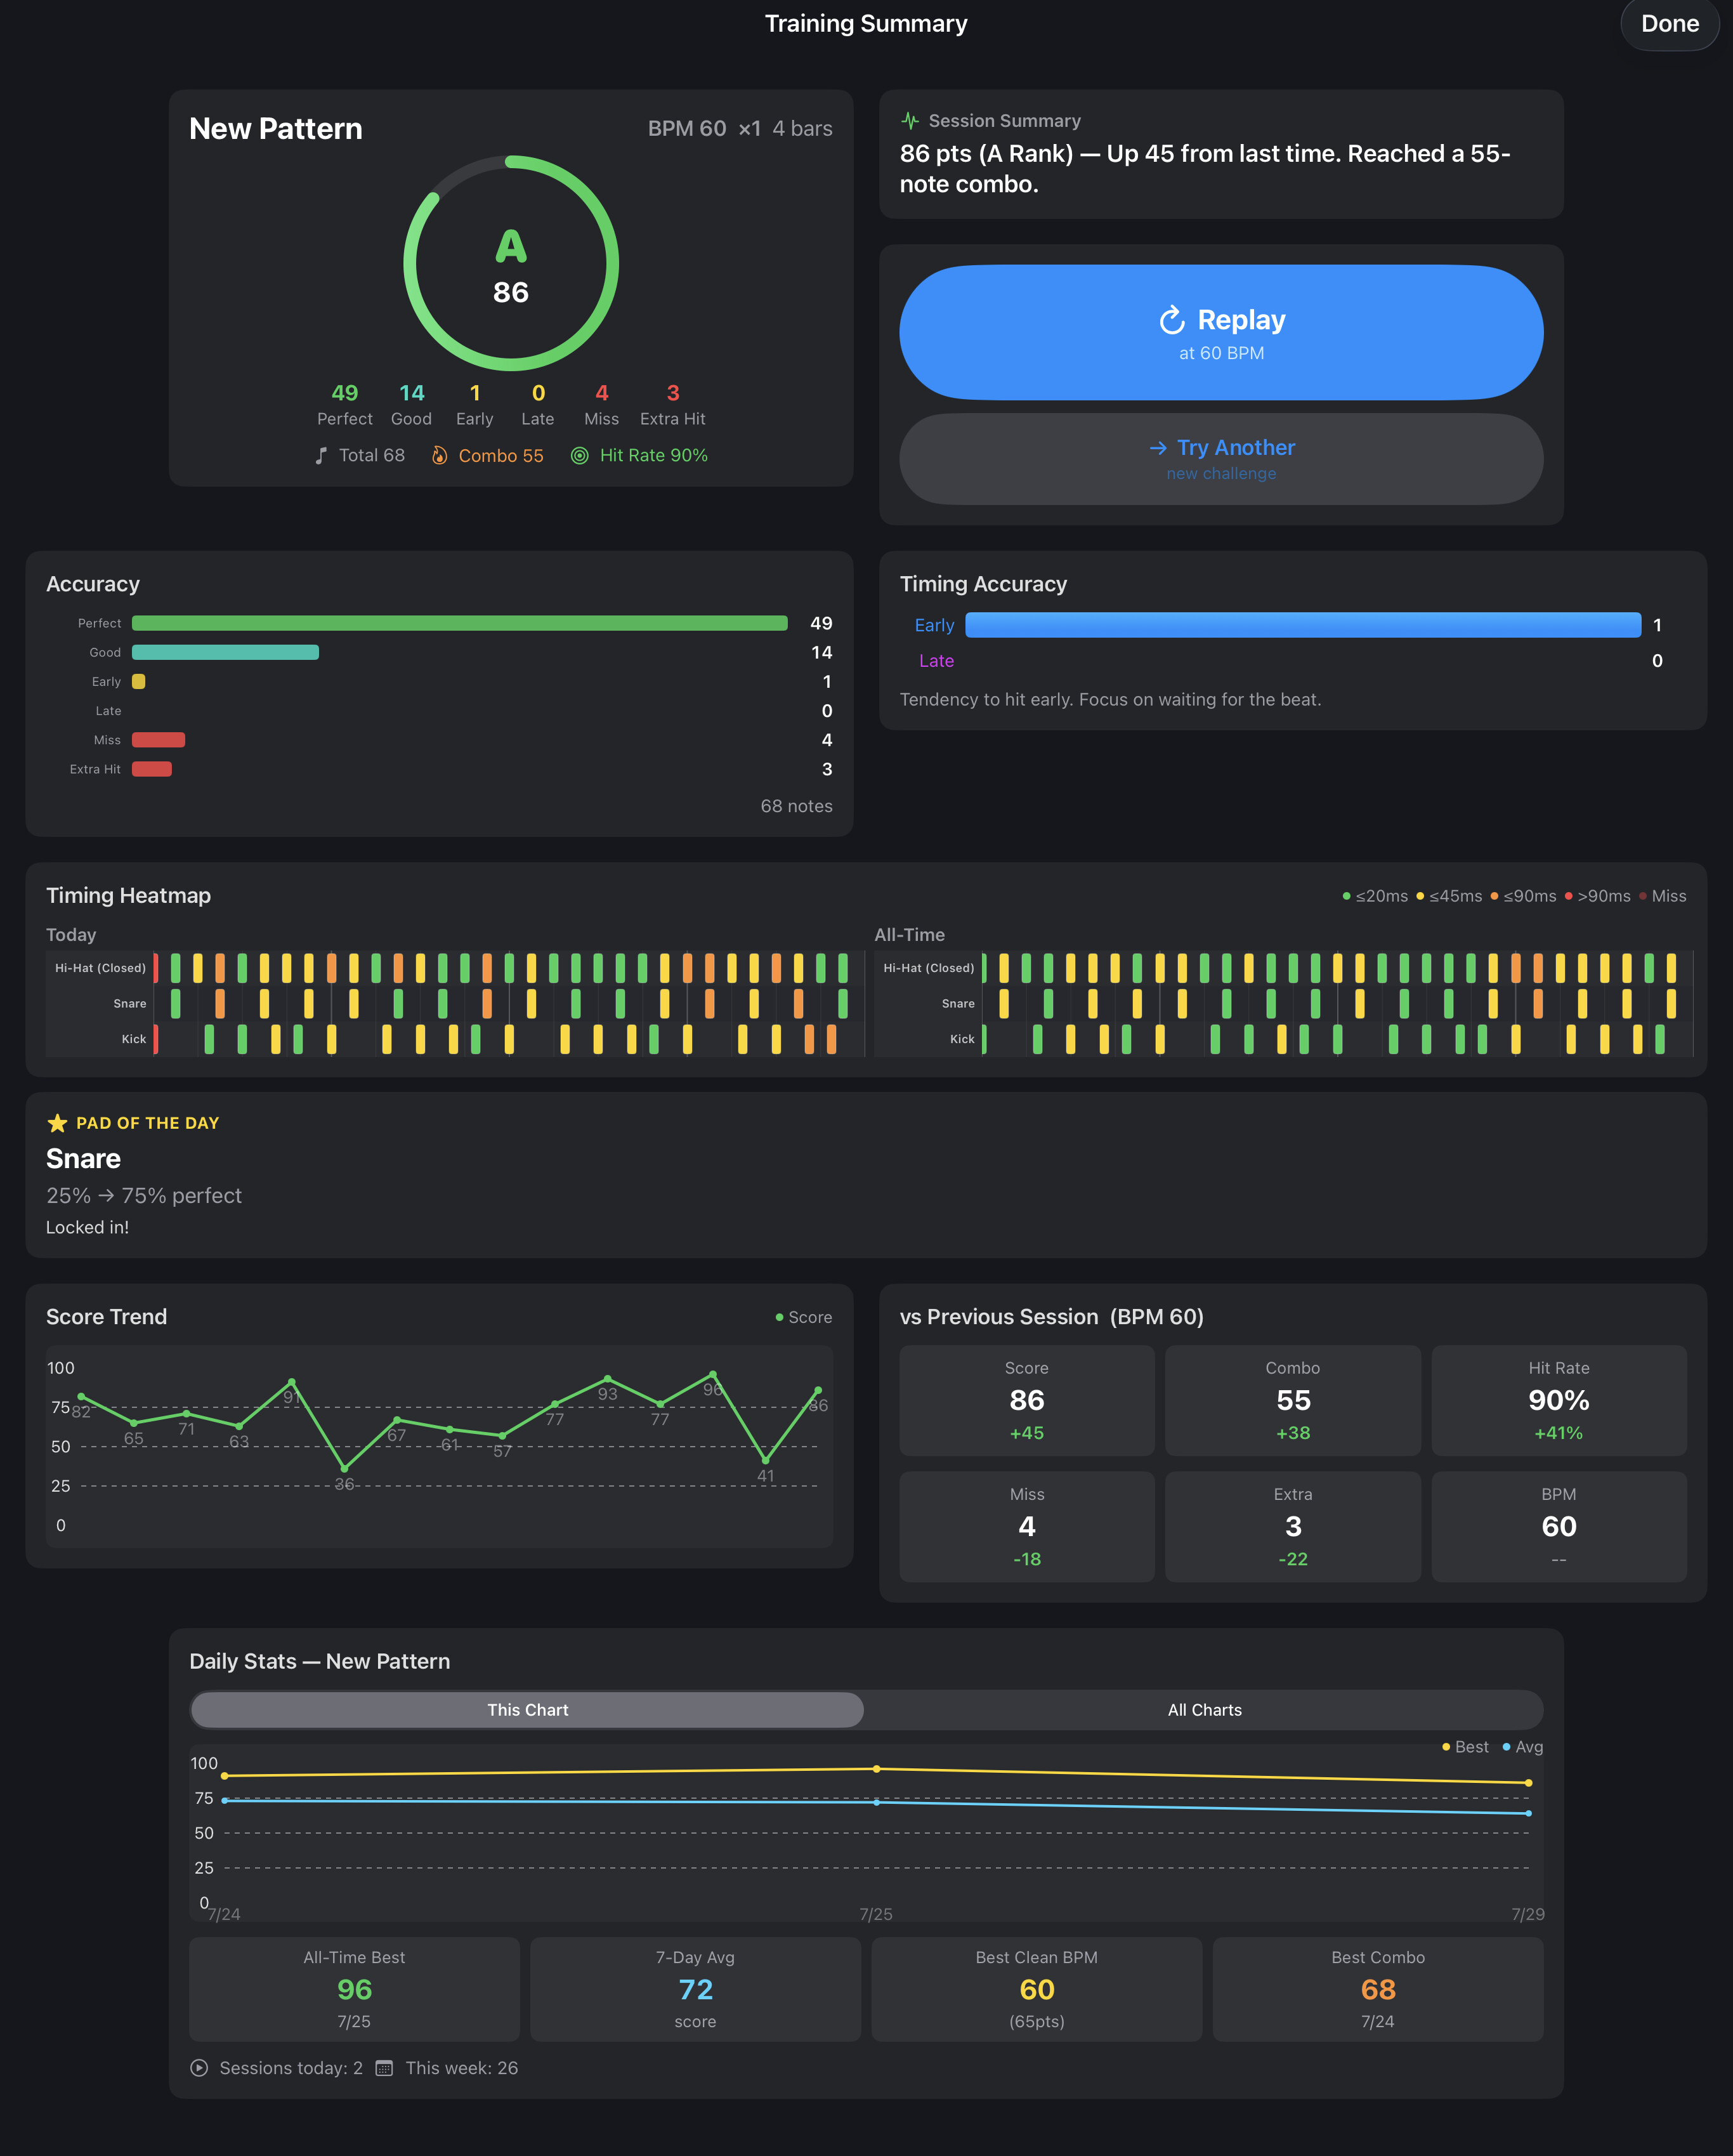
- Score & judgment breakdown — Perfect / Good / Early / Late / Miss / Extra counts and the resulting score.
- Combo — your max consecutive Perfects, and your all-time max combo record.
- Timing heatmap — visualizes today's timing deviations against your all-time tendencies, so you can see exactly where you drift.
- Per-pad statistics — your most accurate pad (PAD OF THE DAY) and the one to focus on next (FOCUS FOR NEXT). Your practice plan writes itself.
- Session story — a two-sentence, plain-language summary auto-generated from your score, combo, accuracy, and timing tendency.
- Streaks — daily streaks and a weekly recap keep motivation going.
- Past-history comparison — see how this run stacks up against your previous attempts.
- Smart retry — based on your score, the app suggests what to do next:
- Speed Up if you scored high
- Replay to chase a better rank
- Slow Down if you need work
- Try Another for variety
All practice data lives locally on your device — see §12 Diagnostics & privacy.
12. Diagnostics & privacy
You control what leaves the device. Crash reporting is off by default.
Crash reporting (opt-in)
- Crash reporting uses Firebase Crashlytics and is disabled by default.
- On first launch (right after onboarding), a one-time dialog asks for your consent. Both choices are saved on the device.
- Change your choice any time at Settings → About → Diagnostics → Anonymous Crash Reporting.
- When enabled, only anonymous crash data — stack traces, device model, iOS version, instance ID — is sent. No personal information, no location, no IDFA, no behavioral analytics. FirebaseAnalytics is intentionally not included, so there's no App Tracking Transparency prompt.
Diagnostics export
At Settings → About → Diagnostics → Generate Report, the app builds a JSON containing the last 24 hours of app logs (OSLog, filtered by the app's subsystem, capped at 500 entries), MetricKit diagnostic summaries (hangs, CPU and disk-write exceptions), an app-state snapshot (selected kit, AUv3 plugin names, sound source count), and device info. The file is written to a temporary directory and shared only when you tap Share Report. A privacy section in the UI lists exactly what is and isn't collected — before you generate or share anything.
On-device data
All practice history, kits, patterns, templates, calibration, app logs, and MetricKit diagnostics live in the app's on-device sandbox. They're included in standard iCloud or Finder/iTunes device backups, but never transmitted to us. Uninstalling the app removes this data.
For the full text, see the Privacy Policy page and the in-app policy at Settings → About → Privacy Policy.
13. Quick reference
Gestures and shortcuts at a glance.
Gestures
| Action | Gesture |
|---|---|
| Play a pad | Tap |
| Play multiple pads | Tap with multiple fingers at once |
| Choke a cymbal | Long-press (≈380 ms) |
| Move a pad (Pad Edit) | Drag the selected pad |
| Reshape a pad (Pad Edit) | Drag a vertex handle |
| Paste a pad (Pad Edit) | Tap a blank area after Copy |
| Navigate bars (Sequencer) | Swipe horizontally on the grid |
| Reorder pads (Sequencer) | Drag and drop the pad row |
| Move patterns (Sequencer) | Drag and drop in the folder tree |
Where to find things
| I want to… | Go to |
|---|---|
| Change a pad's shape or sound | Pad Edit → select pad → Shape / Pad Details |
| Switch drum kits while playing | Play → Kit picker in the metronome bar |
| Play along with a song | Play → Backing Track in the music bar |
| Slow a song without changing pitch | Play → playback speed menu (50–100%) |
| Browse samples inside an SF2 | Pad Edit → Pad Details → Browse Sounds |
| Pick the right starting note for an AUv3 pad | Pad Edit → Pad Details → Audition |
| Build a beat | Sequencer → tap steps on the grid |
| Export a beat as MIDI | Sequencer → Pattern Actions → Export as MIDI |
| Practice a pattern | Sequencer → Send to Training (or Training → My Patterns) |
| Connect to a DAW | Settings → General → MIDI Output |
| Adjust tap velocity to my hand | Settings → Play → Calibrate Touch |
| Toggle crash reporting | Settings → About → Diagnostics |
| Replay the tutorial | Settings → View Tutorial |
| See what an icon does | Tap the "?" button in any performance mode |